Slothboarding
Devlog 01: Research
1. Introduction
Hello everyone and welcome to our first ever devlog!
We are a group of 6 students currently studying Digital Arts and Entertainment (DAE) in Kortrijk, Belgium. This semester we will be making a couch co-op game together an we would like to share the development of the game with you guys.
Time for introductions!
Our team consists of 4 people taking the Game Graphics Production (GGP) major and 2 taking the Game Development (GD) major at DAE. The 4 GGP students are named as followed:
- Arthur Vanneste
- Nicolas Hendriks
- Sarah Hillebrand
- Stefan Gheorge Sorescu
The 2 GD students are named as followed:
- Sacha Gonzalez De Muer
- Brian Hoet
In our game you will compete against your friends in a frenetic, gravity inverted gauntlet where you will have to navigate the environment and pester your friends and enemies in order to reach the finish line before anyone else does.
2. Art
2.1 Style
Given the short time we’ve been given to develop the game we should lean towards an art style that is easy to execute across the board but has great readability and appeal. The same art style should be replicable by all team members with very little to no friction as well. We will mainly focus on 4 overarching styles that comply with the above-mentioned criteria.
We are going for an orthographic 3D look that uses parallax to convey depth.
So far the team has agreed upon a lite, comical, and cheerful look so that’s were a big part of the research will go to
• Flat color, cell shaded/toon shaded:

This style is visually appealing and relatively easy to implement. The colors would be stored in a custom texture atlas while the outlines and tones would be handled by the engine. We would merely have to focus on the silhouette of the characters and environment. There is no hand painting or texturing involved which saves tons of time.
Concerns: In games like Zelda Breathe of the Wild a clear distinction between the character and environment shading had to be made. The characters are heavily outlined and have very little detail other than the flat colors and the shader on top while the environment was allowed to be much richer in detail. To not lose focus of what is important (the characters and their movements) we have to make sure that we balance characters and environment correctly.
TL; DR: Manageable. Only color atlas, engine handles cel shading, highlights and tones.
• PS1 era graphics:
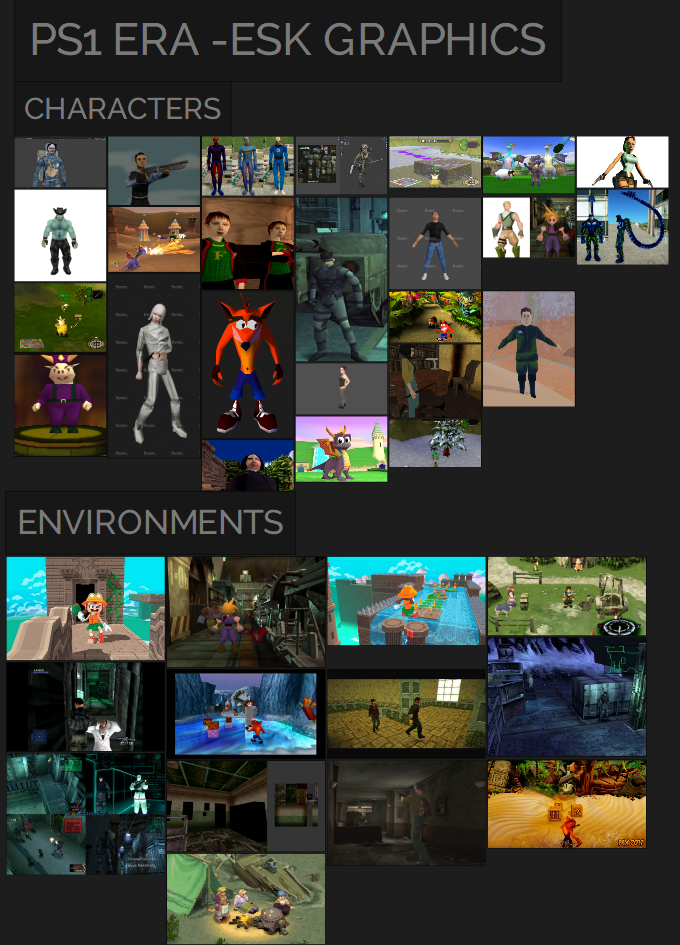
PS1 era graphics are appealing to a lot of people for its simplicity and nostalgic value. Modeling time would be extremely short, and texturing would again consist of an atlas we could pull from. In this case there is SOME hand painting involved although very minimal. By nature, extremely optimized due to low vertex count and absurdly small texture size.
Concerns: although minimal, there is still a bigger amount of time spent on custom made textures than with the style proposed above. It could also be more difficult to nail the style of that era.
TL; DR: Nostalgic. Very low poly geometry, pixelated texture atlas.
• Modern look (PBR)
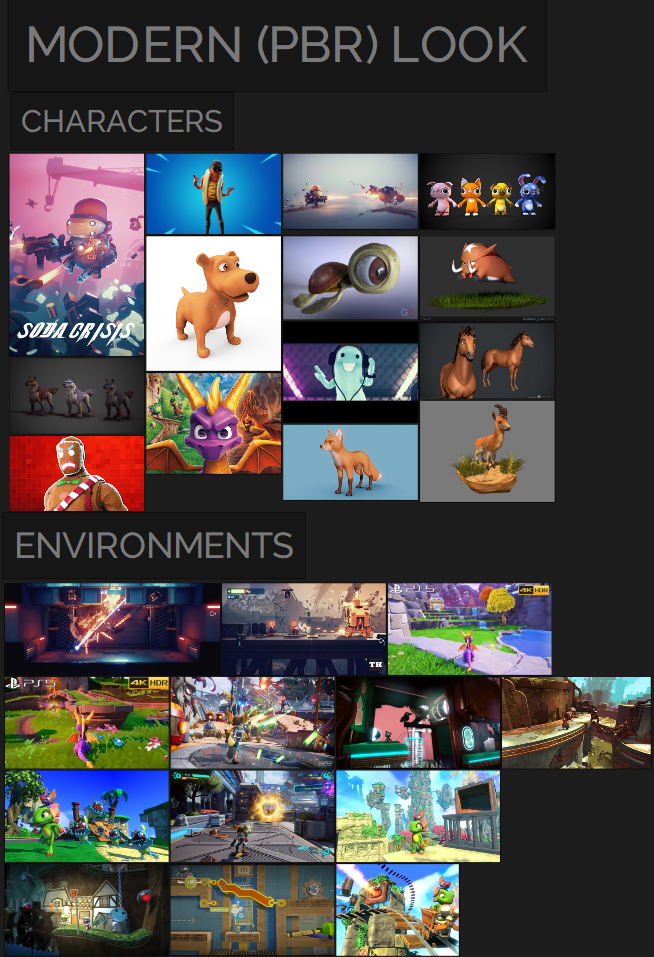
A modern look would focus on creating more physically accurate surfaces taking roughness, metalness, lights and reflections into account at every time and for every item in the game. Water, fire, and dirt particles would lean more into realism as well.
It is worth noting that for this particular look we would not have too much time to go into individual asset texturing and would again have to rely on an atlas composed of tiling textures for all texturing.
Concerns: Optimization and lighting could pose a time issue.
TL; DR: Modern graphics. Metalness, roughness, cool lighting, and reflections.
• NEON & Vaporwave
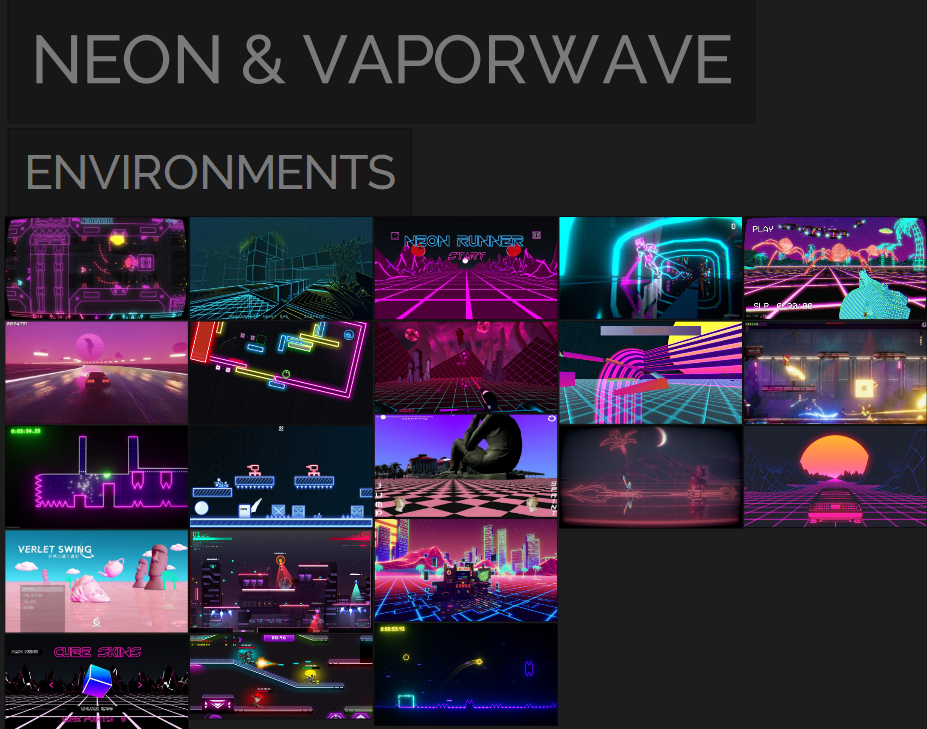
Aesthetically pleasing style with a simplified, neon bright color palette. Feels like entering a digital/alternate version of a recognizable world. A shader can be created to lit up 3D hard edges with the desired color. We can rely heavily on the engine’s shader to create a specific look while only focusing on creating simple geometry to populate the level.
Concerns: low readability and uninteresting look.
TL; DR: Aesthetic vibe. Shader handles hard edge neon coloring, could save time on texturing.
2.2 Deferred vs Forward Rendering
Forward Rendering
Forward rendering is a traditional rendering method that draws each object in the scene one at a time, and calculates lighting for each object individually. This approach works well for scenes with a small number of objects and lights, and it generally has lower hardware requirements compared to deferred rendering.
Deferred Rendering
Deferred rendering, on the other hand, is a newer rendering technique that involves rendering the scene in multiple passes. In the first pass, the geometry and surface information are stored in a buffer, and then lighting calculations are done in a second pass. This approach can handle a large number of lights and objects in the scene with high levels of detail, and it also allows for more advanced effects such as screen-space reflections and ambient occlusion
Ultimately, the choice between forward and deferred rendering depends on the specific needs of the project, as each approach has its own strengths and weaknesses. For example, forward rendering may be better suited for projects with a smaller number of objects and lights, while deferred rendering may be more suitable for complex scenes with a large number of lights and effects.
2.2.1 Our Choice
Since we are going for toon shading / cell shading we are going with forward rendering. forward rendering is more suitable for toon shading because it allows for more control over the shading process, which is important for achieving the stylized look of toon shading.
2.2.2 Motivation
Better control over lighting
Toon shading relies heavily on the lighting model to create the stylized look of the final image. With forward rendering, you have more control over how light affects each object in the scene, including the ability to set per-pixel lighting. This allows you to create sharper edges and more defined shadows, which can enhance the toon shading effect.
No geometry limitations
Forward rendering is capable of rendering all types of geometry, including particles and transparent objects, without the need for extra passes. This can be important if you want to use effects like smoke, fire, or other particle systems in your toon-shaded scene.
Less overhead
Forward rendering is generally more performant than deferred rendering because it doesn't require the creation and storage of multiple G-buffers. This can be important if you're targeting lower-end hardware or want to render complex scenes with many objects.
Simpler shader pipeline
The shader pipeline for forward rendering is typically simpler and easier to optimize than the pipeline for deferred rendering. This can make it easier to create and maintain your toon shading pipeline.
3. Animation
Next we will go over our research regarding animation, we will go over things like what kind of animations do we need, how and where can we create animations and what we should be aware of when creating animations for our game characters.
3.1 Character Animations
• Running
• Sprint/Speed-up
• Normal Jump
• Wall Jump
• Falling
• Running slide
• Crouch
• Grabbing / Hold on to object
• Collecting an item
• Taking damage
• Slowed down
• Stuck/Frozen
• Item use
• Win / Lose (2D or 3D?)
• Gravity transition
3.2 Will we have 2D animations?
Characters will be 3D and probably most of the environment as well. Nevertheless, some parts like the UI, or buff effects, or the movement in the background can be animated in 2D with sprites since they are not the main focus to be 3D, or it is just not necessary to be in 3D (like UI for example).
Those can be created in Photoshop since most of us are familiar with Photoshop. Adobe Animate can also be a helpful tool which takes some time to investigate and get familiar with it.
3.3 Equipment/Software
There are different options to make a rigging for a character. We choose to keep it in Maya since everyone of us is familiar with that program. Animating itself can be done both in Maya or Unreal Engine, depending on the preferences and experience of the team.
We will not make use of motion capturing since the character animations will not be too complex that motion capturing is needed.
Sketching out the key poses, movement, and any other preparation can be done in Photoshop.
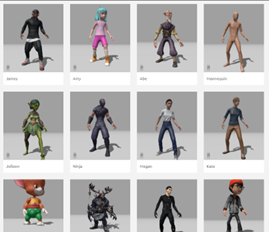
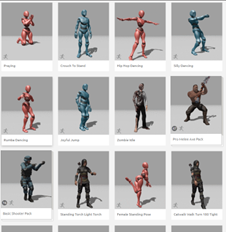
3.4 Adobe Mixamo
The use of Mixamo can be useful if we decide to have a humanoid biped character. Mixamo provides a lot of different character, from stylized to realistic, with a fitting rig. You can choose a character and then select an animation. Since we will do the characters on our own, only the already existing animations will be useful for us. Additionally, it is possible to upload your own character and auto-rig it in Mixamo and let it use its animation on them.
Obviously, this cannot help us out if we decide for a quadruped character or any character on a some kind of vehicle (like our example of having a snail or sloth being on a skateboard).
3.5 Complexity and details
The specific movement of the characters will be developed after sketching out concepts for the character itself. However, depending on how large the characters will be shown on screen, we’ll have to adjust details and complexity of the animations.
The character will not be large on the screen but rather smaller since the 2-4 players must see enough of the Level/environment to react properly in advance. Therefore, the animations do not need a lot of details and can be kept basic and simple. Most of the actions can be emphasized by animation effects to make it even more visible and clear for the player what is happening since there is a lot going on during gameplay. That will save us time and unnecessary work for details in the movement which will not be much seen during the game.
The art style we are going for will be stylized and kept quite simple. A lot of details in the characters are not necessary. That means the actions/animations have to fit as well by being simple but clear, and still flexible and dynamic to fit into the fun and hectic atmosphere/surrounding and gameplay. Exaggeration in animating can be beneficial for certain actions to be even more clear. Going into a realistic direction for the movement seems unfitting for the style and genre we are going for. When animating we have to keep into account that stretching can be an issue.
Therefore, creating our characters rather in an A-pose than T-pose seems to be beneficial to reduce stretching around the arms and shoulders. But squashing and stretching the whole character can lead to a vivid motion of the character which we want to achieve. That needs to be tested out to see what fits best.
3.6 Variation of animations
Having characters with different personalities/abilities means we also need to have different animations which represents the character's personality and/or ability well and clear.
That also leads to the question whether there are secondary actions like holding a weapon/an item while running and how do we plan to implement those. Let's stick to the example of holding a weapon while running in a fast-paced side scroller. We could have a variation of a "basic running" animation with the slight difference of holding the weapon and moving a bit differently, or we keep it simple and leave the original running animation as it is and just add the item to the hand holding it. This for sure depends on what the character will look and move.
3.7 Duration
It is also important that the duration of each animation fits to the game. Since we create a fast-paced side scroller, we should keep the animations clear but short so that it does not take too long for the player to react to certain threats by other players or the environment. For example, having an animation to jump ideally feels quick and flexible, without time to "load energy" or something similar, but also not too stiff and heavy. Having a look into the principles of animation will help us.
3.8 Workflow
Before we start to do any kind of animation it is required to gather enough references and prepare the animation beforehand. These can be done by:
- sketching out key poses/ different poses
- video references (record yourself or teammates and play the character animation for a better understanding)
- thinking about dynamic, what the animation should depict/tell, how do we visualize that
- timing and spacing, squeeze and squash, which principles of animating are useful/necessary for our character
- cube pass; To get a feeling of how long should the animation take, how fast
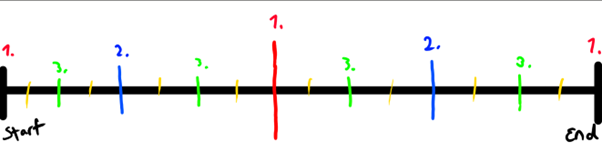
When it comes to placing the keys we could start to work our way through from start to end and set key by key until the animation is done. Or we first set 3 main keys: the start position, the middle position and the end position (1). Then fill the timeline between the three main keys with positions in between (2) and after that fill the rest with transitions to correct mistakes (3).
3.9 In Unreal Engine:
The import of skeletal meshes and animations can be easily done by just dragging the resources into the content browser of Unreal, like we used to do with other fbx, materials, etc.
Since we are not allowed to use Blueprints, the animation blueprints with its event graph in Unreal will not be used. We can create/keyframe our own animations in Unreal itself as well. That needs to be discussed in group meetings if Maya or Unreal is preferred.
However, the Blendspace option in Unreal engine is a good tool to help us merge animations and make smooth transitions between different actions, for example idle and running. How much this is visible on screen depends on how large the characters will be shown on screen and how fast they will move.
4. User Interface
The user interface (UI) of a game should achieve several goals, including providing players with the necessary information and tools to interact with the game, creating an immersive experience that enhances the game's overall style and aesthetic, and guiding players through the game's objectives and mechanics.
4.1 User Interface and Style
The user inteface (UI ) is linked to the style of the game in several ways.
1. The UI should match the overall visual style and aesthetic of the game.
2. It should match the tone and mood of the game
3. It should be designed to support the gameplay mechanics and objectives of the game.
During this part of the research, we will mainly focus on exploring the possibilities for the functionality of the heads-up display (HUD) to support the currently planned mechanics.
Once we settle on an art-style for our game we will proceed with designing UI elements like the menus, loading screens, tutorials, etc.
4.2 Designing a Heads-up Display
When designing a HUD (Heads-Up Display) for a game, there are several important things to think about;
• Information Hierarchy
Important information should be easy to see and read
• Clutter
A cluttered HUD can be distracting and/or overwhelming for the player. Therefore unnecessary elements need to be minimized
• Aesthetics & Readability [To be researched later, goes hand in hand with artstyle]
• Contextual Information
The HUD should provide contextual information regarding the current gameplay situation.
Overall, the HUD should be designed to provide the necessary information to the player in an unobtrusive way that does not distract from the gameplay experience. It should be clear, easy to understand, and visually appealing.]
4.3 HUD Prototypes
Based on the research above we have put together some prototypes for a potential HUD. It is important to note that these prototypes haven’t been tested in-game so it is sure further adjustments will be needed.
We will separate this into two sections; Player status HUD and Layout.
Player Status
Each player needs to know his own status. In our current design the player can hold an item and teleport to the other side of the level using teleport charges.
So for each player we need to know the following things:
- What player element belongs to me?
- How many teleport charges do I have?
- What Item am I holding?
To start off we made a crude layout containing all the information we need.
Version 1
Version 1.1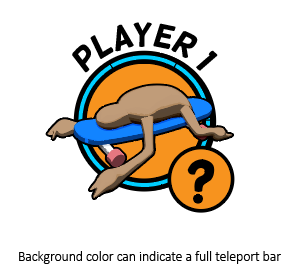
In this example each player gets his own bubble, teleport charges are indicated on the blue outline of the player bubble and a flashing text appears to let the player know his charges are full. Next to the player bubble an item bubble tells the player which item or buff he is holding.
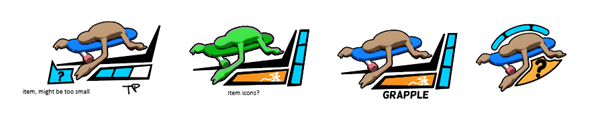
Using this we can determine what information is redundant and which is crucial. But if we want multiple players our screen will get cluttered(!) really quick, so we need to simplify. To simplify we can look at possibly redundant elements;
The first thing that pops in mind is that the player can be represented by his color or skin. So we can remove the player text. And since we’re removing text, we might as well find a way to get rid of all the text.
Previously we would indicate a full charge by a flashing a “Teleport ready” text. So we should find a way to convey this better.
Version 2 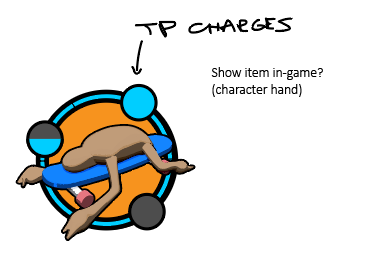
In this simplified version we think about the possibility of showing the player which item he is holding in the world only. This is an idea worth exploring further in the next research sprint.
The player would differentiate himself using the color of either the character or the background. And teleport charges are represented more boldly, in an attempt to remove the need for text telling us the status of the charges.
Variations
From the previous results and the knowledge gathered we are capable of making variations. These are no where near finalized, but it gives us a good idea of what we need for a final product.
HUD Layout
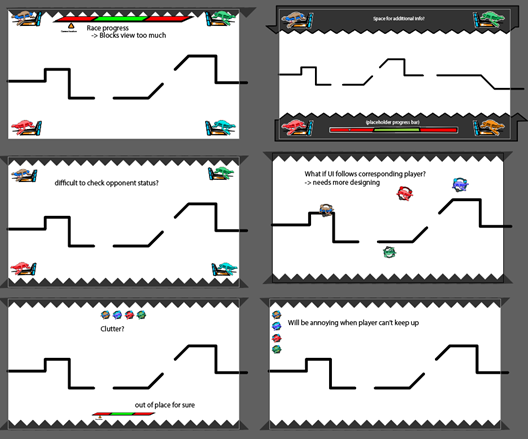
By experimenting with HUD layouts a couple of problems were immediately apparent, and revealed further research questions for next research sprint:
• How do we prevent the HUD to block important game elements?
-> What are our important game elements?
• Is it relevant for player to be able to check the opponents status?
• How do we make our level / camera so that it accommodates for HUD elements?
• How much information do we want represented on the HUD and how much do we want to represent in the world?
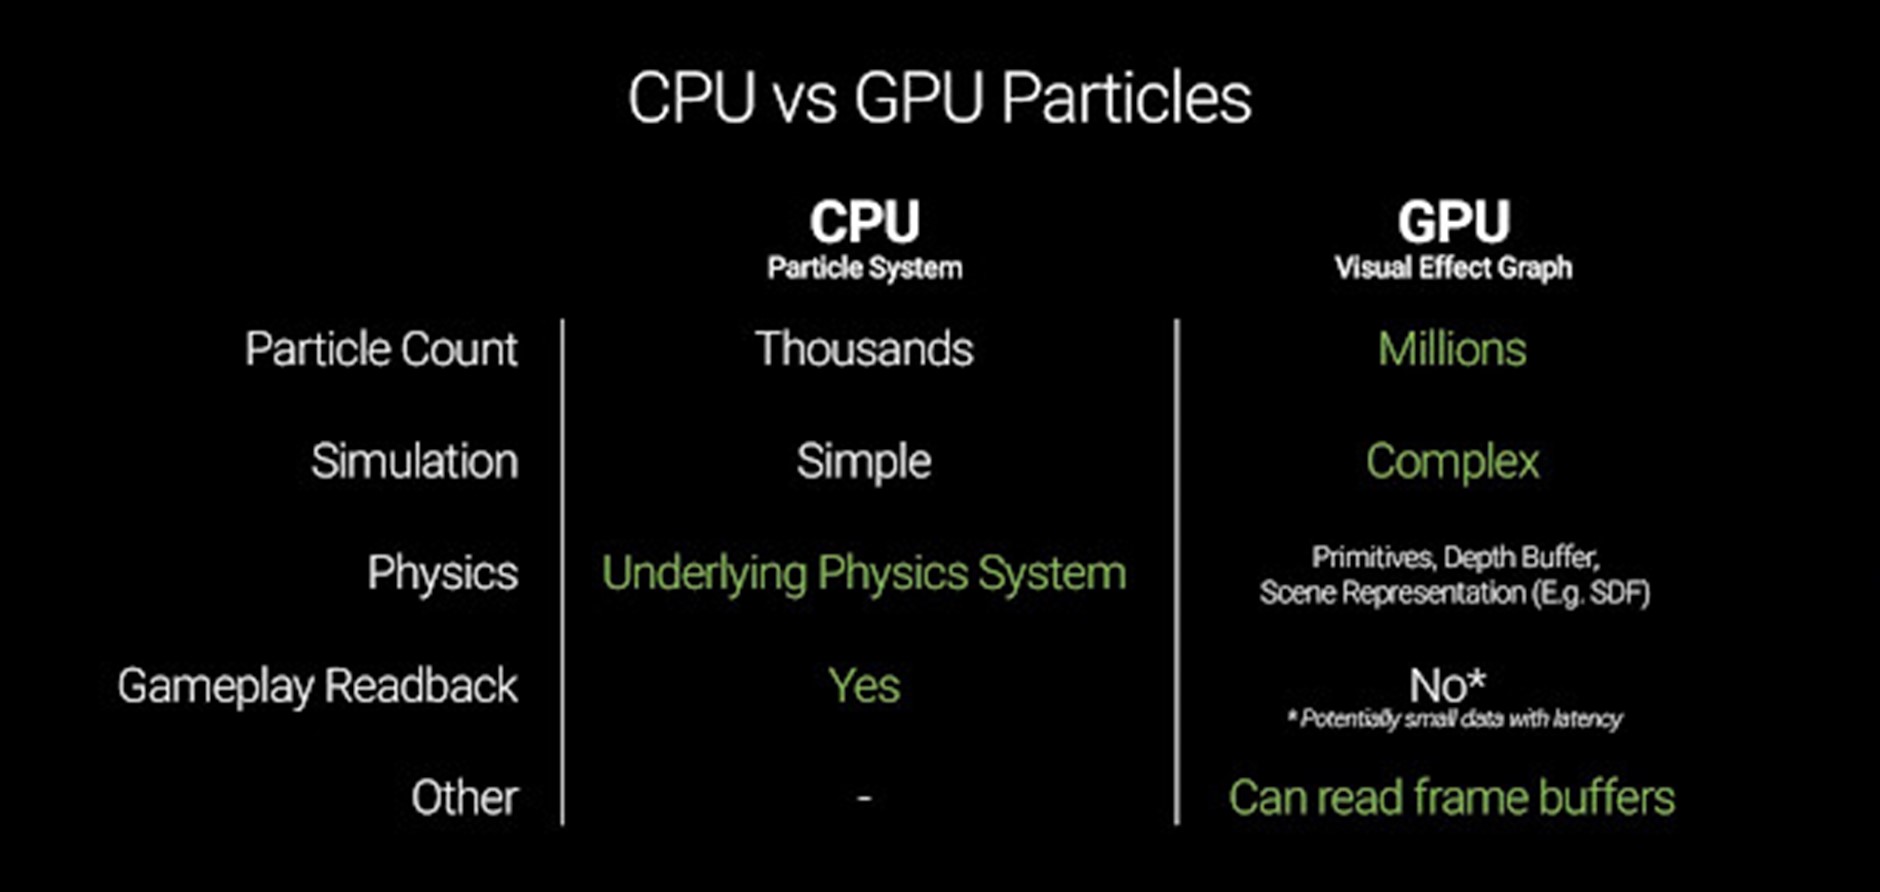
5. Particles
5.1 CPU and GPU Sprite Particles Comparison – UNREAL
One of the particle types available in Unreal Engine 4 is GPU Sprites. These are particles that are first spawned on the CPU, but then processed and calculated entirely by the graphics card. The benefit to this is that since the GPU is handling the calculation, many thousands more particles can be processed at once, allowing for much denser and more detailed particle systems.
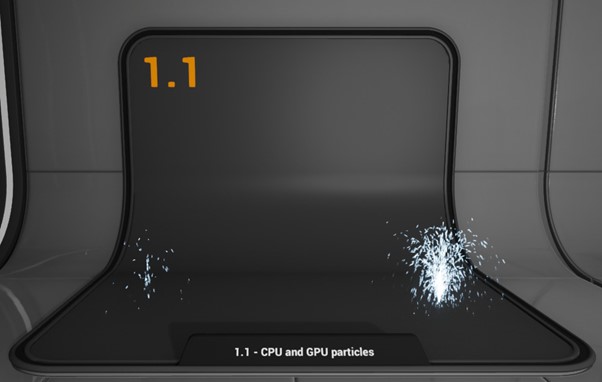
This first effect shows off two very simple particle fountains, one created via standard CPU particle sprites and the other via GPU sprites. Notice that the fountain on the right - which uses GPU particles - is outputting significantly more particles than the other.
CPU and GPU sprites behave similarly, but they have some key differences. Some of the features available in the CPU particles (such as light emission, Material parameter control, and Attraction modules to name a few) are not supported in GPU particles.
However, what they lack in supported features they more than make up for in sheer numbers; the GPUSprite TypeData allows you to spawn tens to hundreds of thousands of particles without a severe performance impact. This of course will significantly change the way we approach doing effects such as snowfall, rain, or sparks.
Bear in mind that some modules will not support GPU particles. If you are using incompatible modules in your Emitter, those modules will be highlighted in red.
5.2 Particle System GPU Instancing – UNITY
GPU instancing offers a large performance boost compared with CPU rendering. You can use it if you want your particle system to render Mesh particles.
A limitation of GPU instancing is that Billboard particles (like far away fog facing camera), which cannot be instanced on GPU.
As with Niagara, operations are partly GPU-accelerated, with Unity GPU instancing, it can easily handle millions of particles.
Unity comes with a built-in particle shader that supports GPU instancing, but the default particle material does not use it, so you must change this to use GPU instancing. The particle shader that supports GPU instancing is called Particles/Standard Surface.
To use it, you must create your own new material, and set the material’s shader to Particles/Standard Surface. You must then assign this new material to the material field in the Particle System renderer module.
If you are using a different shader for your particles, it must use ‘#pragma target 4.5’ or higher. See Shader Compile Targets for more details. This requirement is higher than regular GPU Instancing in Unity because the Particle System writes all its instance data to a single large buffer, rather than breaking up the instancing into multiple draw calls.
You can also write custom shaders that make use of GPU Instancing. In the given example there is a custom shader adds a feature which the standard particle shader does not have - a fade between the individual frames of a texture sheet animation.
There is also GPU instancing with custom vertex streams support. With custom vertex streams, we can send data to the shader, such as velocities, rotations and sizes. There is an example on unity documentation where they instance on the GPU a shader that makes particles brighter, the faster they go.
5.3 Summary: Rendering type in relation to Particle Effects
Forward Rendering
Forward rendering can be slower if we use a lot of particles, due to multiple rendering passes), but deferred rendering can result in less precise control over appearance (which can result in less efficiency)
Pros:
- Precise control over each particle's appearance, allowing for custom shading and effects
- Efficient for rendering small numbers of particles, especially when they are close to the camera
- Less efficient for rendering large numbers of particles, as each particle requires a separate rendering pass
- Can result in overdraw, where multiple pixels are drawn for the same object, leading to decreased performance.
Cons:
- Less efficient for rendering large numbers of particles, as each particle requires a separate rendering pass
- Can result in overdraw, where multiple pixels are drawn for the same object, leading to decreased performance.
Deferred rendering
Pros:
- More efficient for rendering large numbers of particles, as particles can be grouped into larger batches for rendering.
- Reduces overdraw by minimizing the number of pixels drawn for each object, leading to increased performance.
- Can result in less precise control over each particle's appearance, as shading calculations are performed on pre-rendered buffers.
- Requires more memory than forward rendering, as multiple buffers must be stored and maintained.
Cons:
- Can result in less precise control over each particle's appearance, as shading calculations are performed on pre-rendered buffers.
- Requires more memory than forward rendering, as multiple buffers must be stored and maintained.
Generally, forward rendering is best suited for rendering small numbers of particles with custom shading, while deferred rendering is more efficient for rendering large numbers of particles with simpler shading. However, the specific trade-offs will depend on the specific requirements and constraints of the project.
5.4 What engine fits our use case best regarding particles?
Unreal Engine
Pros:
- GPU particles can be used for more efficient rendering and better performance.
- More powerful and flexible material editor for creating custom particle materials.
- Built-in support for Niagara, a more advanced particle system with additional features.
- Can be more resource-intensive and require more powerful hardware to run efficiently.
Cons:
- Can be more resource-intensive and require more powerful hardware to run efficiently.
Unity
Pros:
- Efficient and optimized particle rendering, especially with the use of the Burst Compiler and Job.
- Built-in support for the Shader Graph, allowing for the creation of custom particle materials.
- Limited support for GPU particles, which can limit performance for larger particle systems
- Standard particle system may lack some of the advanced features of Unreal's Niagara system
Cons:
- Limited support for GPU particles, which can limit performance for larger particle systems
- Standard particle system may lack some of the advanced features of Unreal's Niagara system
Both Unreal Engine and Unity can create efficient and customizable particles. However, Unreal Engine may be better suited for more advanced particle systems that require a high degree of flexibility and customization, while Unity may be better suited for simpler particle systems that require ease of use.
5.5 Why would Unreal Engine be the better option?
Unreal Engine offers several extra customization options for particles that go beyond what is available in Unity. Here are some of the key features that make Unreal's particle system more advanced and flexible:
- GPU particles: Unreal Engine allows particles to be processed on the GPU, which can provide significant performance benefits for large and complex particle systems. This feature enables particles to be rendered faster and more efficiently, making it possible to create more particles without sacrificing performance.
- Niagara particle system: Niagara is Unreal Engine's advanced particle system, which offers a wide range of features and customization options that go beyond what is available in the standard particle system. Niagara allows for the creation of complex particle systems with advanced simulations, dynamic behavior, and more.
- Flexible material editor: Unreal Engine's material editor is highly flexible and customizable, making it possible to create a wide range of particle materials with a high degree of control over their appearance and behavior. The material editor supports a wide range of parameters and functions, allowing for the creation of custom particle shaders and effects.
- Cascade particle system: Although Niagara is the newer and more advanced particle system in Unreal Engine, the older Cascade system still offers a wide range of features and flexibility. Cascade allows for the creation of complex particle systems with advanced behaviors, particle collisions, and more.
- Blueprints integration: Unreal Engine's visual scripting system, Blueprints, can be used to create complex particle systems that respond to player input or other events in the game. Blueprints make it possible to create complex particle behaviors without writing any code.
Unreal Engine's particle system offers a wide range of customization options that go beyond what is available in other game engines. With features like GPU particles, the Niagara and Cascade particle systems, flexible material editors, and Blueprints integration, Unreal's particle system provides a high degree of flexibility and control over particle behavior, appearance, and performance.
5.6 Why would Unity be the better option?
Unity Engine offers simpler to use particle solutions and for our needs could probably output the same amount of quality. Particles support GPU instancing, but also need CPU to be calculated.
- Ease of Use: Unity's particle system is widely considered to be more intuitive and user-friendly than Unreal Engine's particle system. This can be especially advantageous for small games where we need to quickly prototype and test particle effects without needing to spend a lot of time.
- Scripting Language: Unity uses C# as its primary scripting language, which is widely considered to be easier to learn than Unreal Engine's C++. This can make it easier for developers to create and test particle effects with custom shaders.
- GPU Instancing: Unity's support for GPU instanced particles allows artists to create massive numbers of particles with minimal performance impact. This can be especially useful for creating rich particle effects without sacrificing performance.
- Cross-Platform Support: Unity supports a wide range of platforms, including PC, Mac, and consoles. This can be especially advantageous if we are looking to rapidly prototype and test the game to ensure it works and performs as intended.
Both Unreal and Unity seem to have good and fitting solutions for particles. With Unity I am thinking we should choose either URP or Built-in rendering solution. Both have support for cel shading, but Built-in seems to become less supported and considering the aspects of our game URP with forward rendering could be the way to go.
6. Gameplay
During our brainstorming week we landed upon a game that puts 2-4 players against one another in an intense and competitive race where players are encouraged to pester and sabotage each other.
During our first research week we focus on proving that this concept makes for a valid and fun game.
6.1 Mechanics
Below is a list of the tested game mechanics
Core Mechanics:
- Gravity changing depending on the side of the level the players find themselves on
- Intuitive movement: Player can jump, wall-jump, and run swiftly
Abilities:
- Players can push each other
- Instant teleport to the other side of the level
Items:
- Additional jump pads
6.2 Prototyping: Finding the fun
As mentioned the focus of this weeks research regarding gameplay was to prove that our mechanics are fun.
To achieve this it was important to immediately focus on the feeling of each mechanic that was implemented.
For this the mechanic didn’t need to be fully polished, but the part that works should be fun before anything m else. A lot of focus was put to having good movement, since the game is all about racing we need the players to never feel slow, clumsy or stiff.
Another aspect that is very important to our concept is being able to mess with the opposing player. Therefore it was crucial to implement the capability to test the demo with two players, and add a way for them to mess with each other. This was done by adding the ability to push a nearby player.
These two things proved to be the main contributors to the fun of our game.
6.3 Challenges
The first prototypes revealed a couple of challenges, which we will be addressing in our next research week.
• What is the best way to make gravity switch portals consistent?
-> Trigger boxes proved to be very inconsistent
-> Simple calculations limit the orientation of our portals
• Local multiplayer in Unreal Engine is more of a challenge than in Unity
-> We need to figure out whether this issue is solvable
• How will our camera behave when players move around?
-> And how will our players react to touching the outer edges of the screen?
6.4 Engine
Each dev was assigned an engine to work on the prototype. This way we hoped to learn which would fit our workflow and project best.
6.4.1 Prototyping in Unreal Engine
We created a prototype in Unreal Engine 5.1. We made the main mechanic, which changes the gravity when the player goes through a portal. We first encountered some problems with this because Unreal Engine has a character movement component which has a Boolean for “Is Falling” But the issue with this is that it only works for normal gravity. We fixed this by making a ray cast from the middle of the player towards the feet. And if the ray cast hits a bool is on true that the player is on the ground. It’s direction also switches when the gravity is reversed. We also created a coin that boosts the players jumping height for a limited time. We tried to add local multiplayer, but this failed due to a bug in UE5.1. There should be a work around for this but we haven’t figured that out yet.
Pros:
- Blueprints allows us to more easily manipulate our (C++) code.
- UE also has better physics than Unity has which we could apply to many of the features we've discussed internally
- UEs user interface system is easy to use and expand upon
Cons:
- Both devs are less experienced with UE's workflow, which would cost us a lot of time in order to learn. On top of that it learning this could prevent us from getting the best product we can make.
- UE5.1 has a bug which we can’t make a local multiplayer like we normally would do, so we have to find a work around for this. But we haven’t found one yet. Consumed a lot of time to try implement this feature.
6.4.2 Prototyping in Unity
The Unity prototype is the one we've uploaded onto our itch.io page, it includes the mechanics mentioned before.
Pros:
zUnity is less complex than unreal, resulting in less learning time for the devs, which in turn allows us to go through iterations faster.
- Local multiplayer is unbelievably easy to set up
Cons:
- UI can quickly become a nightmare when working with different aspect ratios
- Game design possibilities for artists limited ( Blueprints are more intuitive + the artists are more experienced with UE )
- Inferior physics system
Leave a comment
Log in with itch.io to leave a comment.