Slothboarding
Devlog 04: Production Sprint 1 - Week 1
1. Introduction
This week the team focussed on serval things such as Code planning, Environment and Level design. In this devlog we'll go over what we have done. We didn’t start coding just yet because we wanted to be prepared.
2. Code planning: UML Diagram
Now that the prototyping phase is over it’s time for the programmers to use knowledge gathered and start from scratch to create a clear game plan regarding the structure of our games framework. For this we decided to create an UML diagram, this will make sure both programmers are on the same page on the layout of the framework.
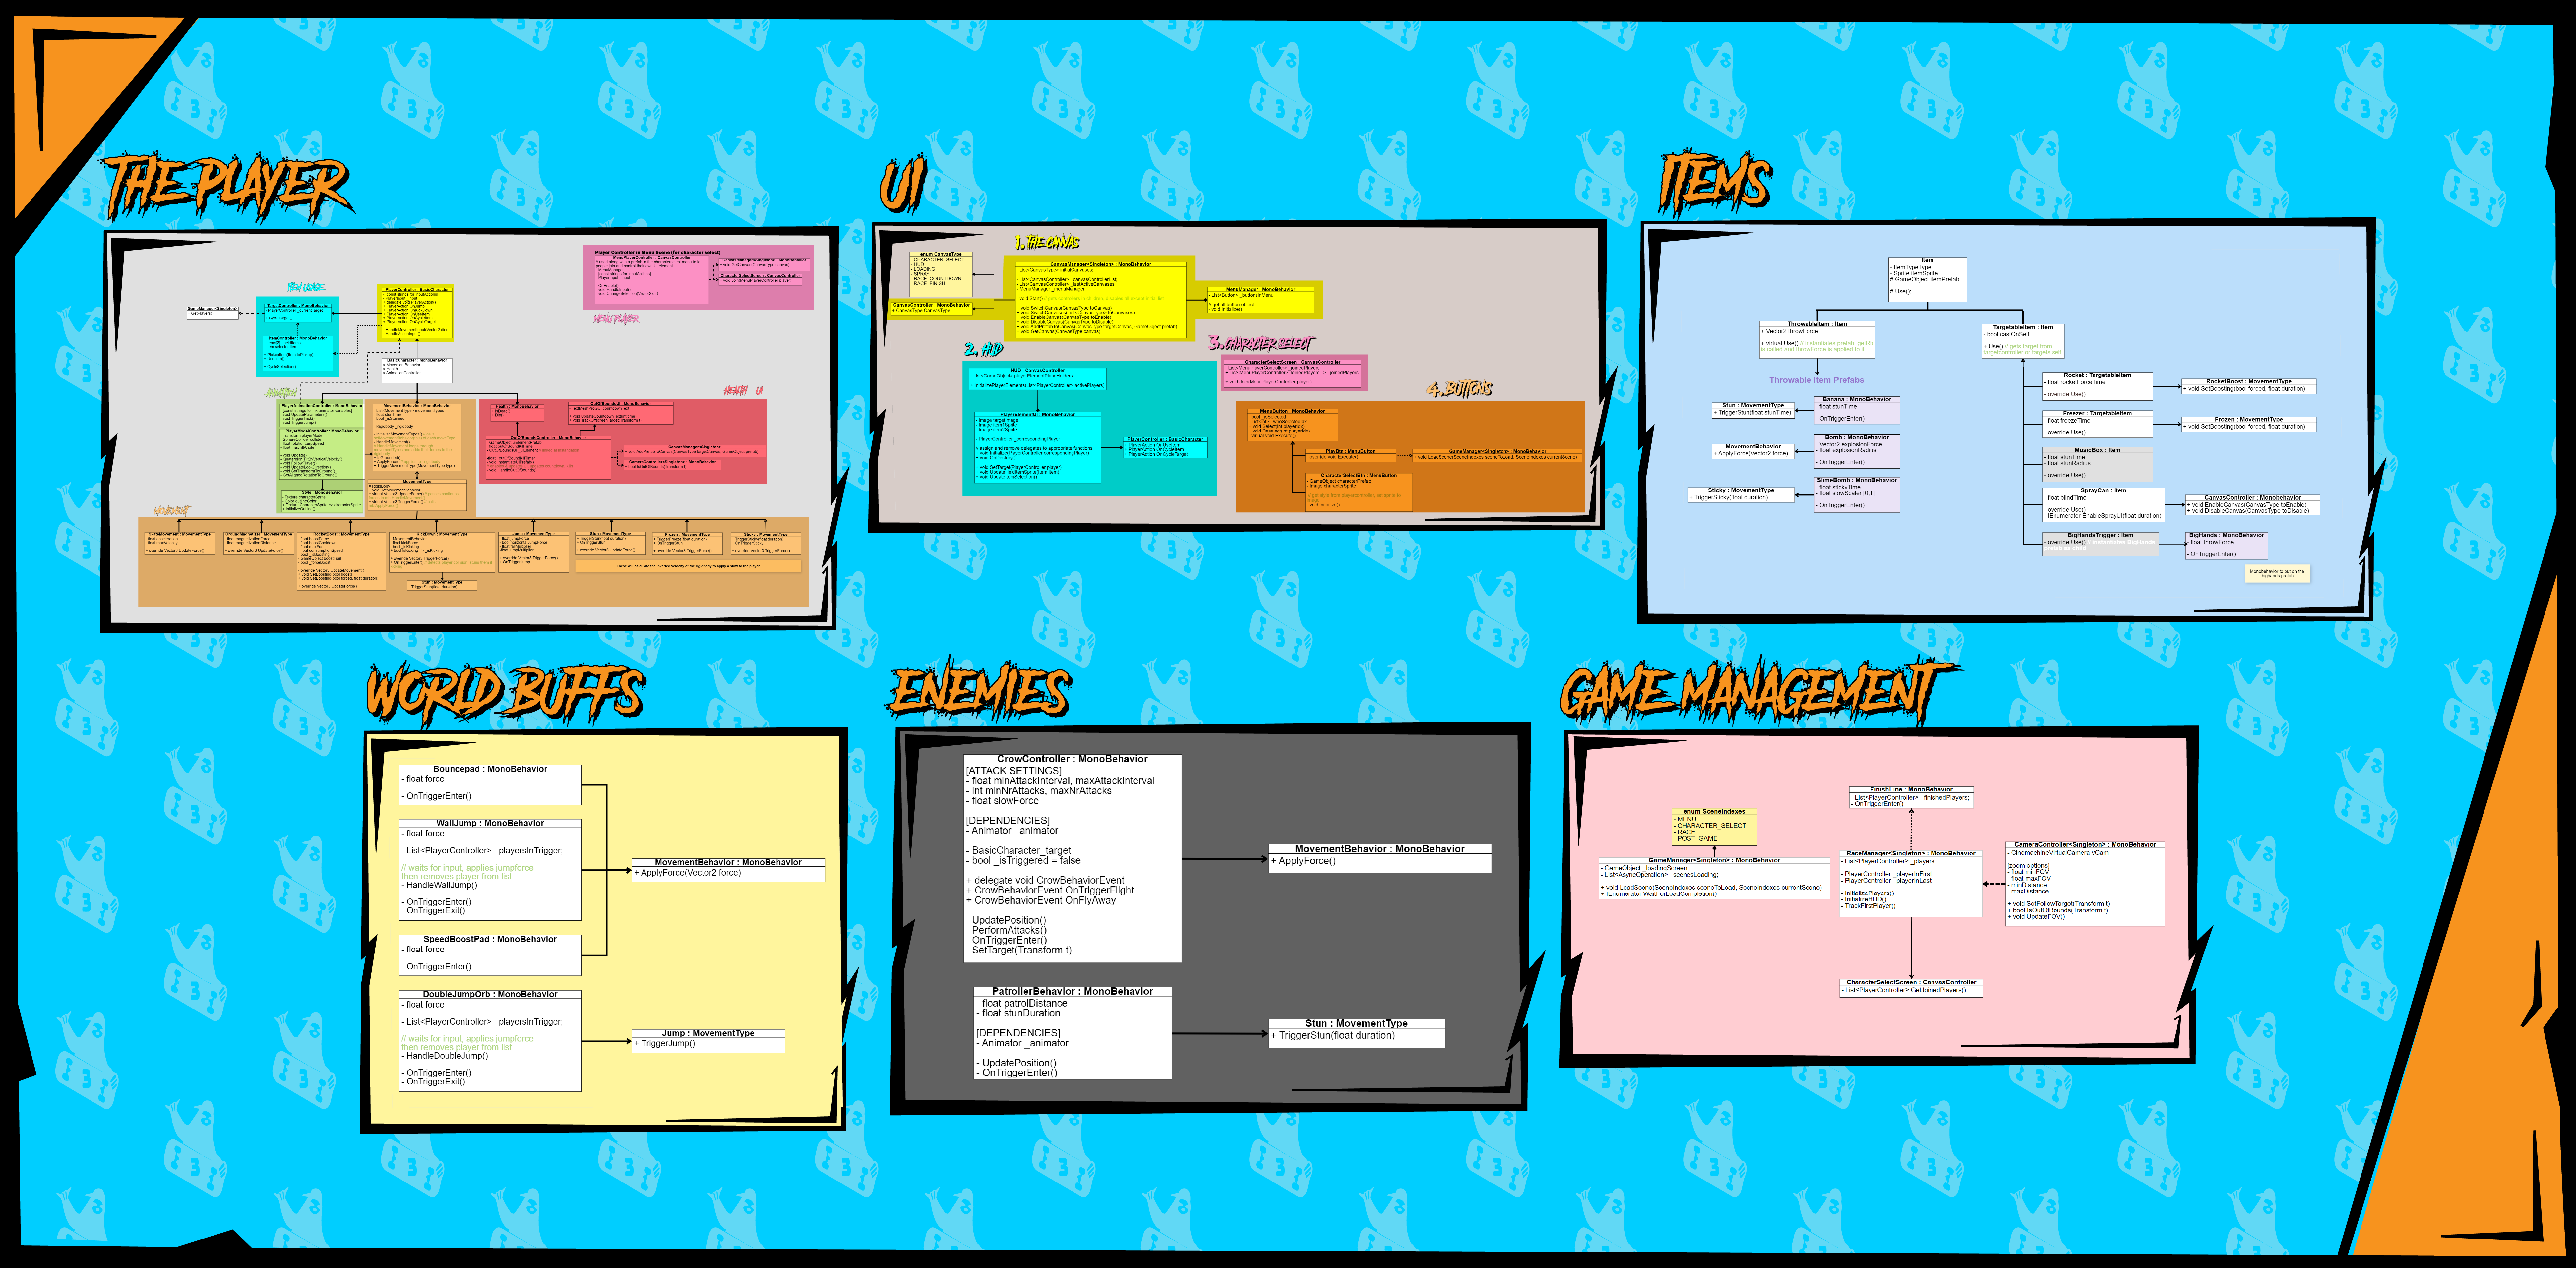
However, this diagram is still a “birds eye view” of what we need for our project and unplanned elements could appear any time. In which case the programmers will need to discuss how the new element will fit into the diagram and update it accordingly.
For now let’s go over the different parts of the diagram to get a better overview and understanding of it.
2.1 The Player
To start off we’ll get the biggest part of the framework out of the way; the player. The player structure can be split into 6 parts each of which we’ll briefly go over.
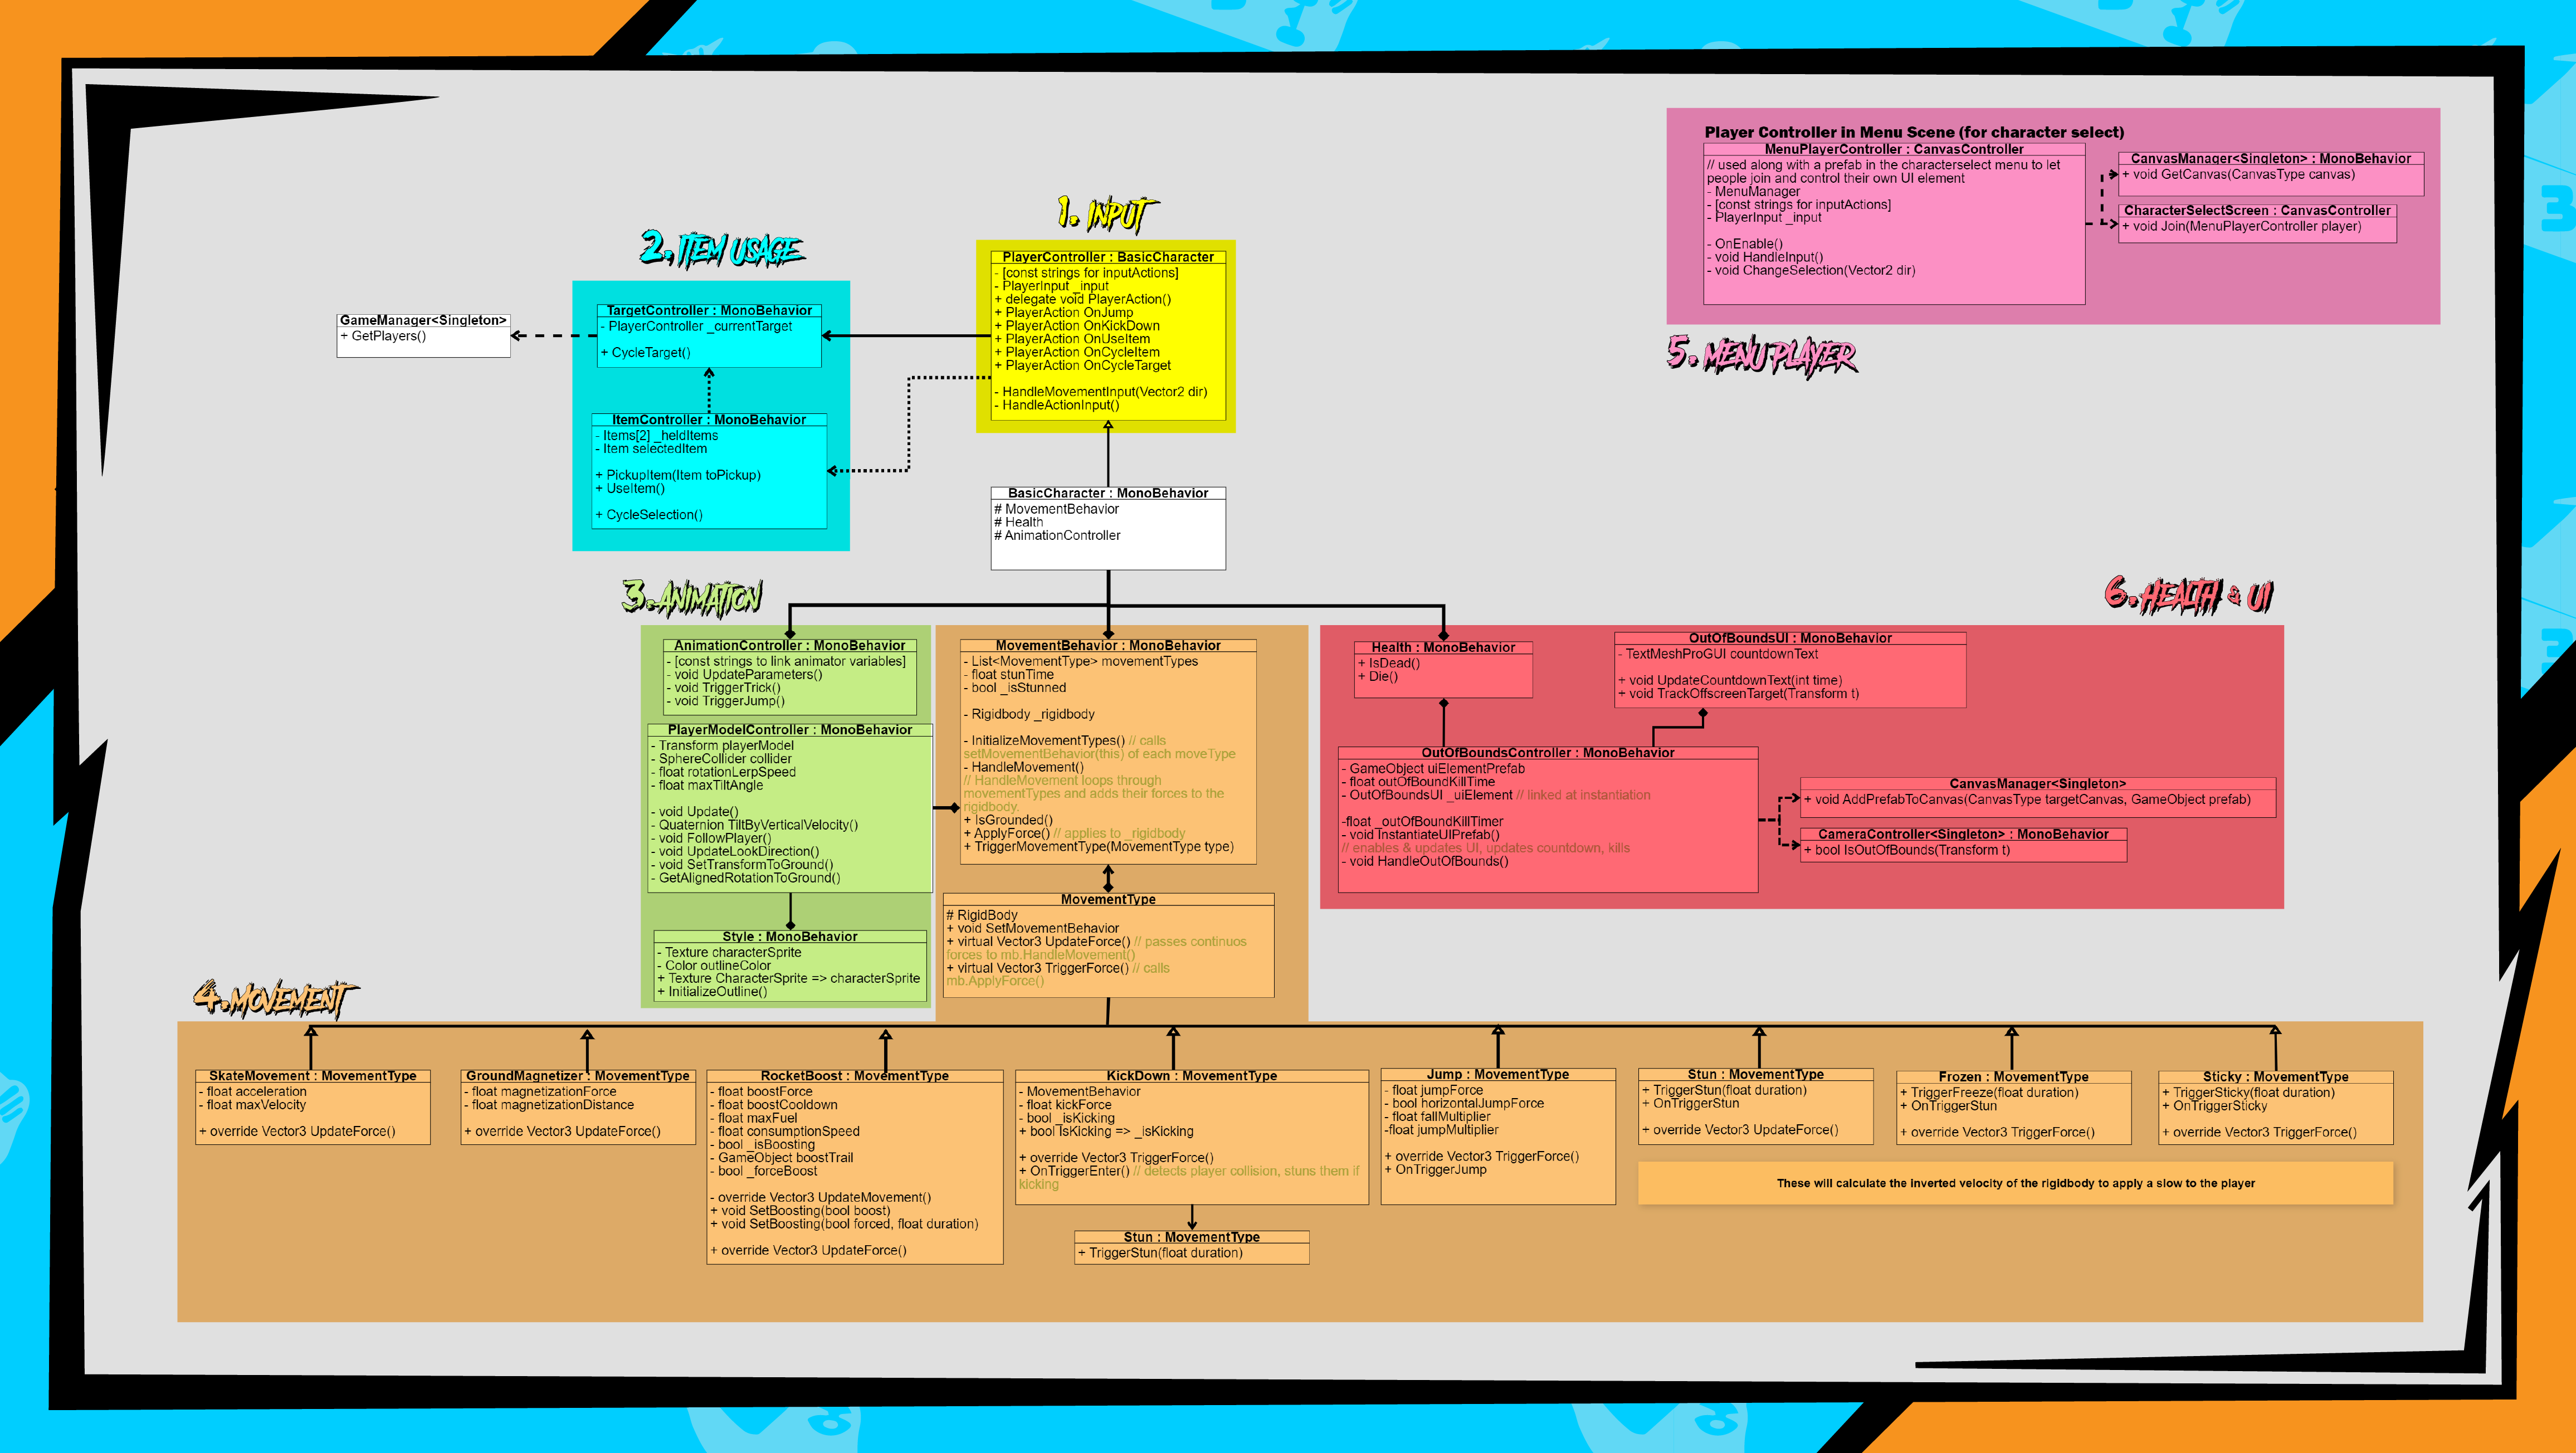
2.1.1 Player Input
The simplest yet very crucial part will be the PlayerController class, which is responsible for detecting and processing input. It makes use of Unity’s new input system to bind actions to any input device and allows for easy integration of multiple players and uses delegates to allow other components like the animation controller or the UI to subscribe to player actions without creating a hard coded dependency on both ends. This will keep the PlayerController class much cleaner since lots of actions need to happen when the player inputs.
2.1.2 Item Usage
Close to the player input are the item management classes. Since our game is all about targeting opposing players to pester them, a separate class for targeting players was made to allow for expansion with different targeting mechanics outside of items. For example the TargetController could be used on enemies and accessed by other enemy scripts to guide the enemy.
However, in context of the player the TargetController will be accessed by the ItemController, which has the responsibility of using and keeping track of the items that the player is holding, as well as selecting which item he will be using.
2.1.3 Animation
To drive our animation we will be using a pattern previously used by one of our programmers which uses an AnimationController class to drive Unity’s built-in animator. This controller will subscribe to corresponding events to trigger animations and will update animator parameters. This means that this component is dependent on at least the PlayerController, its MovementBehavior and the animator driving the animations within Unity.
Very close to the AnimationController, but without any actual connection to it, is the PlayerModelController.
This controller will correctly position the player mesh to the sphere which drives the player movement (more later). Doing this gives us a lot more freedom over the movement and animation of the player model, since a lot of its animation will have secondary movement outside of its actions. Some examples are rotating the board and player along the terrain, or tilting them according to their vertical velocity.
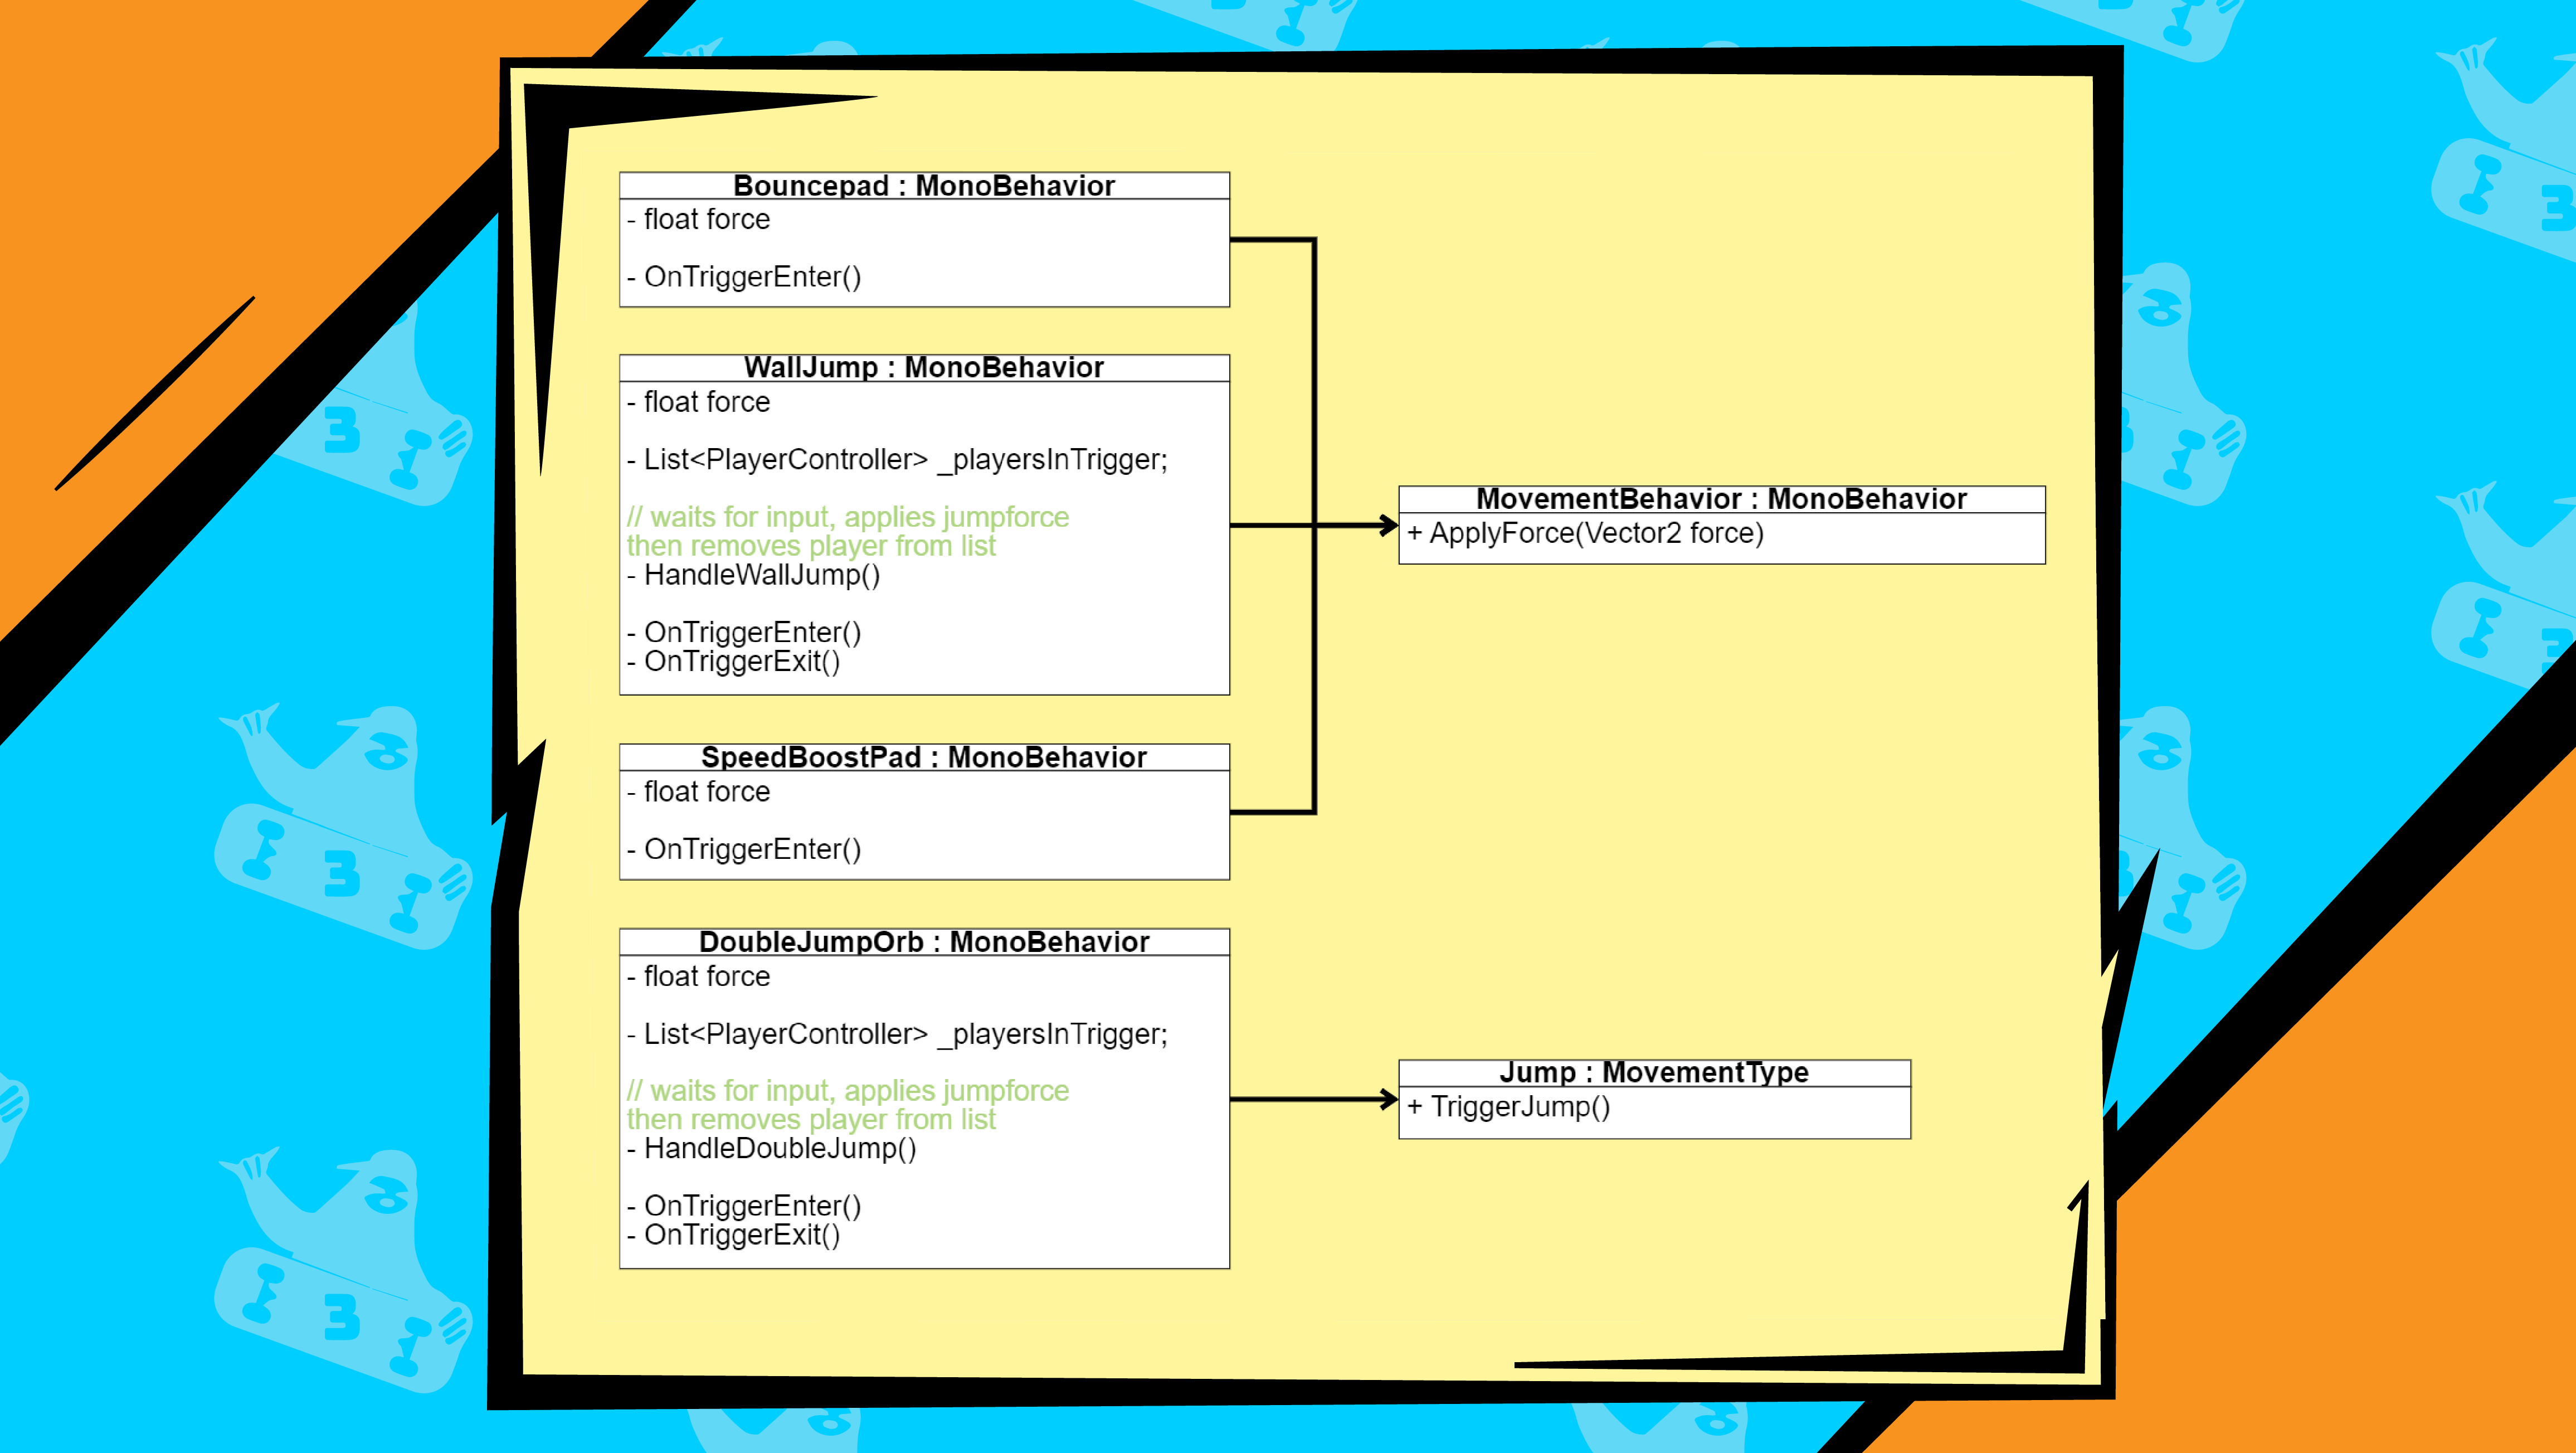
2.1.4 Movement
The biggest part of the players structure is the movement. Since movement is at the core of our game it needs to be expandable and easily modifyable. To this end we designed our MovementBehavior script to be modular. It expects a list of MovementTypes which can be added and removed by game designers.
The goal is to have more separated logic to keep a clean overview of each movement behavior we want to implement while allowing easy and specific access to individual movement types. MovementTypes can override two functions;
• UpdateForce()
This will return a force that will continuously be applied to the rigidbody of the MovementBehavior which is holding the MovementType. So it can be used for basic acceleration from the players input, or a constant magnetizing force that sticks the entity to the ground (which is a part of making the player movement feel good)
• TriggerForce()
This will apply an instant force to the rigidbody once when called by whatever function needs to. For forces which slow down the player the negated velocity of the rigid body can be used.
2.1.5 Health & UI Element
The health component for our game is very simple since all an entity can do regarding is is die since there’s no damage or respawning. In the context of the player one crucial component triggers this; the OutOfBoundsController.
This component is responsible for everything that happens when a player exits the screen bounds. It’s also tightly coupled to its UI element, which will receive information about where the player finds himself outside the screen and how long he can stay there.
The controller will be responsible for enabling and disabling this ui element when needed.
2.1.6 Menu Player
The smallest part of the player controller is separated from most of the game logic. This controller will be used in a separate character selection screen to process player input.
2.2 UI
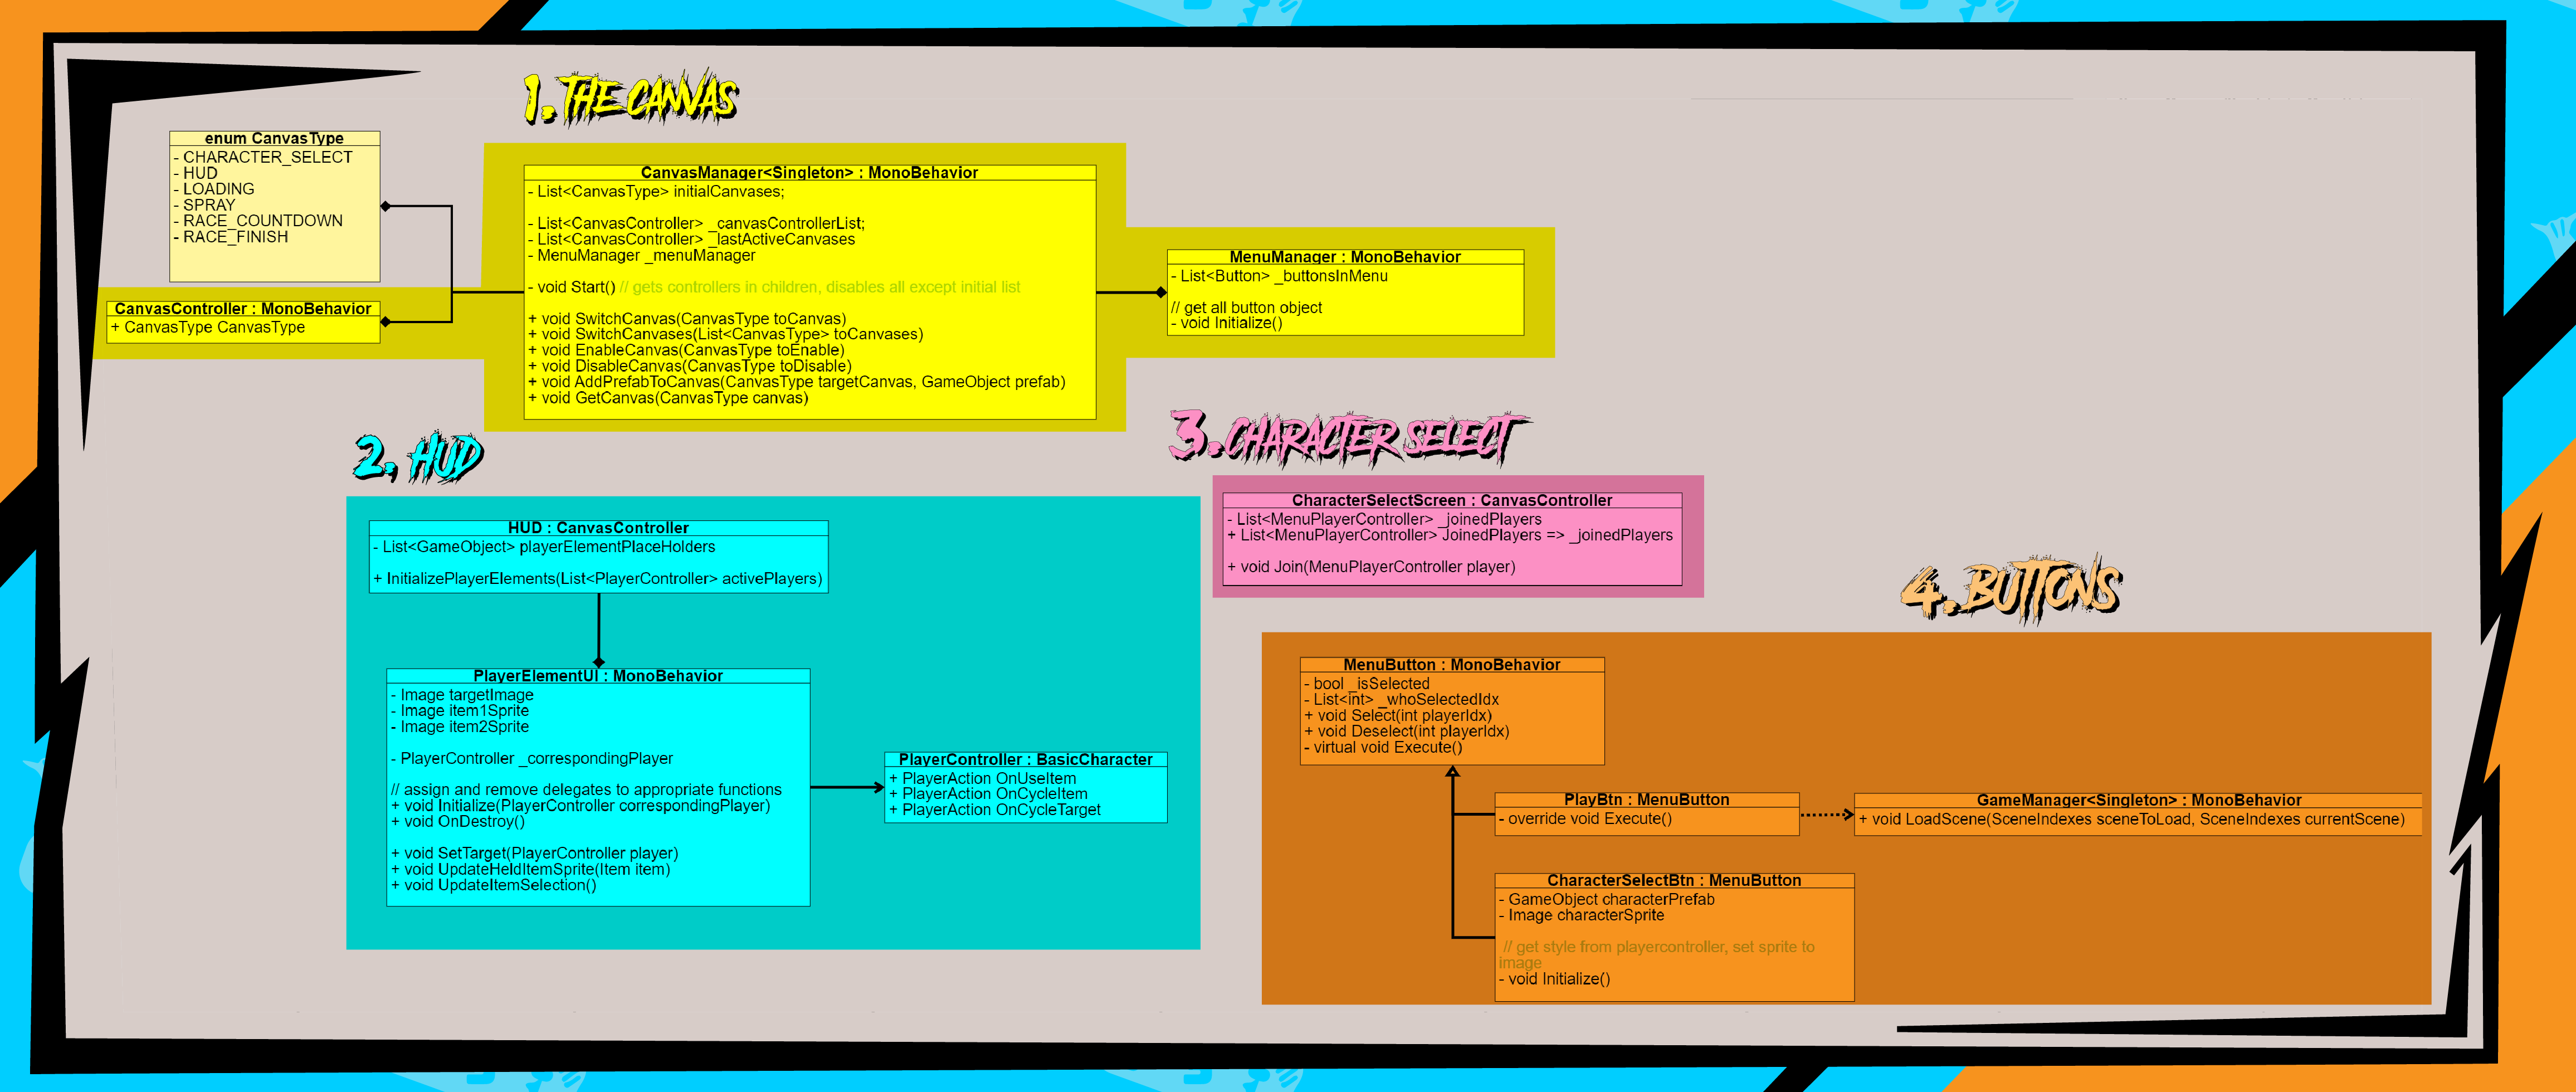
2.2.1 The Canvas
The canvas is the layer on which all the UI objects will be. In order to easily switch between UI elements we will work with a manager that keeps a list of “controllers”, which is a panel with a script that only holds an enum which tells us what’s on the panel.
Since the CanvasManager is at the root of all the controllers we can get all our references easily, and by knowing what’s in the content of the controller we can write an efficient system to control each panel. To make access to the UI easy across our framework we made the CanvasManager a singleton.
The menu manager is responsible for navigating the menus, for now it only keeps a list of buttons, however we’re still unsure about how menu navigation works because we didn’t prototype any yet. So that part will be revisited once character selection needs to be implemented. To give the input controller needs easy access to the menu manager and to this end it felt right to make it a component of our canvas manager.
2.2.2 HUD
The HUD will be a panel with 4 empty child game objects. Each game object will be used to instantiate a player element for each active player on to it. The player element will access its corresponding players PlayerController to get data and update accordingly.
2.2.3 Character Selection Button
The character selection screen demonstrates the convenience of our canvas manager pattern, by deriving from CanvasController we can add functionality to our canvas neatly within the controller. This controller will add joined players to our list, and will be used when loading into the game scene to instantiate the players.
2.2.4 Buttons
Our buttons need functionality for selection, so we will use a base class that enables this. From there additional functionality can be added.
2.3 Items

Items will be approached in two ways, throwables and targetables. The reason for this is that throwable items need to exist in the world before they can trigger their effect, while a targetable item is directly cast onto a target.
2.3.1 Throwable Items
We thought the best way to approach the item that needs to exist in the world to be instantiated with a prefab which holds its functionality and its world components. So the scripts on our throwable items will solely rely on Unity’s collision system to detect targets and apply its effect onto them.
2.3.2 Targetable Items
Targetable items will access the players target controller to mess with them accordingly. One thing to note is that a targetable can be marked as castable on self, which does as you’d expect. This is used for items which need to behave as buffs.
2.4 World Buffs
World buffs are world items that have an instant positive effect on players that enter them. Because of this, these scripts will use Unity’s collision and will be attached to a game object along with a collider.
2.5 Enemies
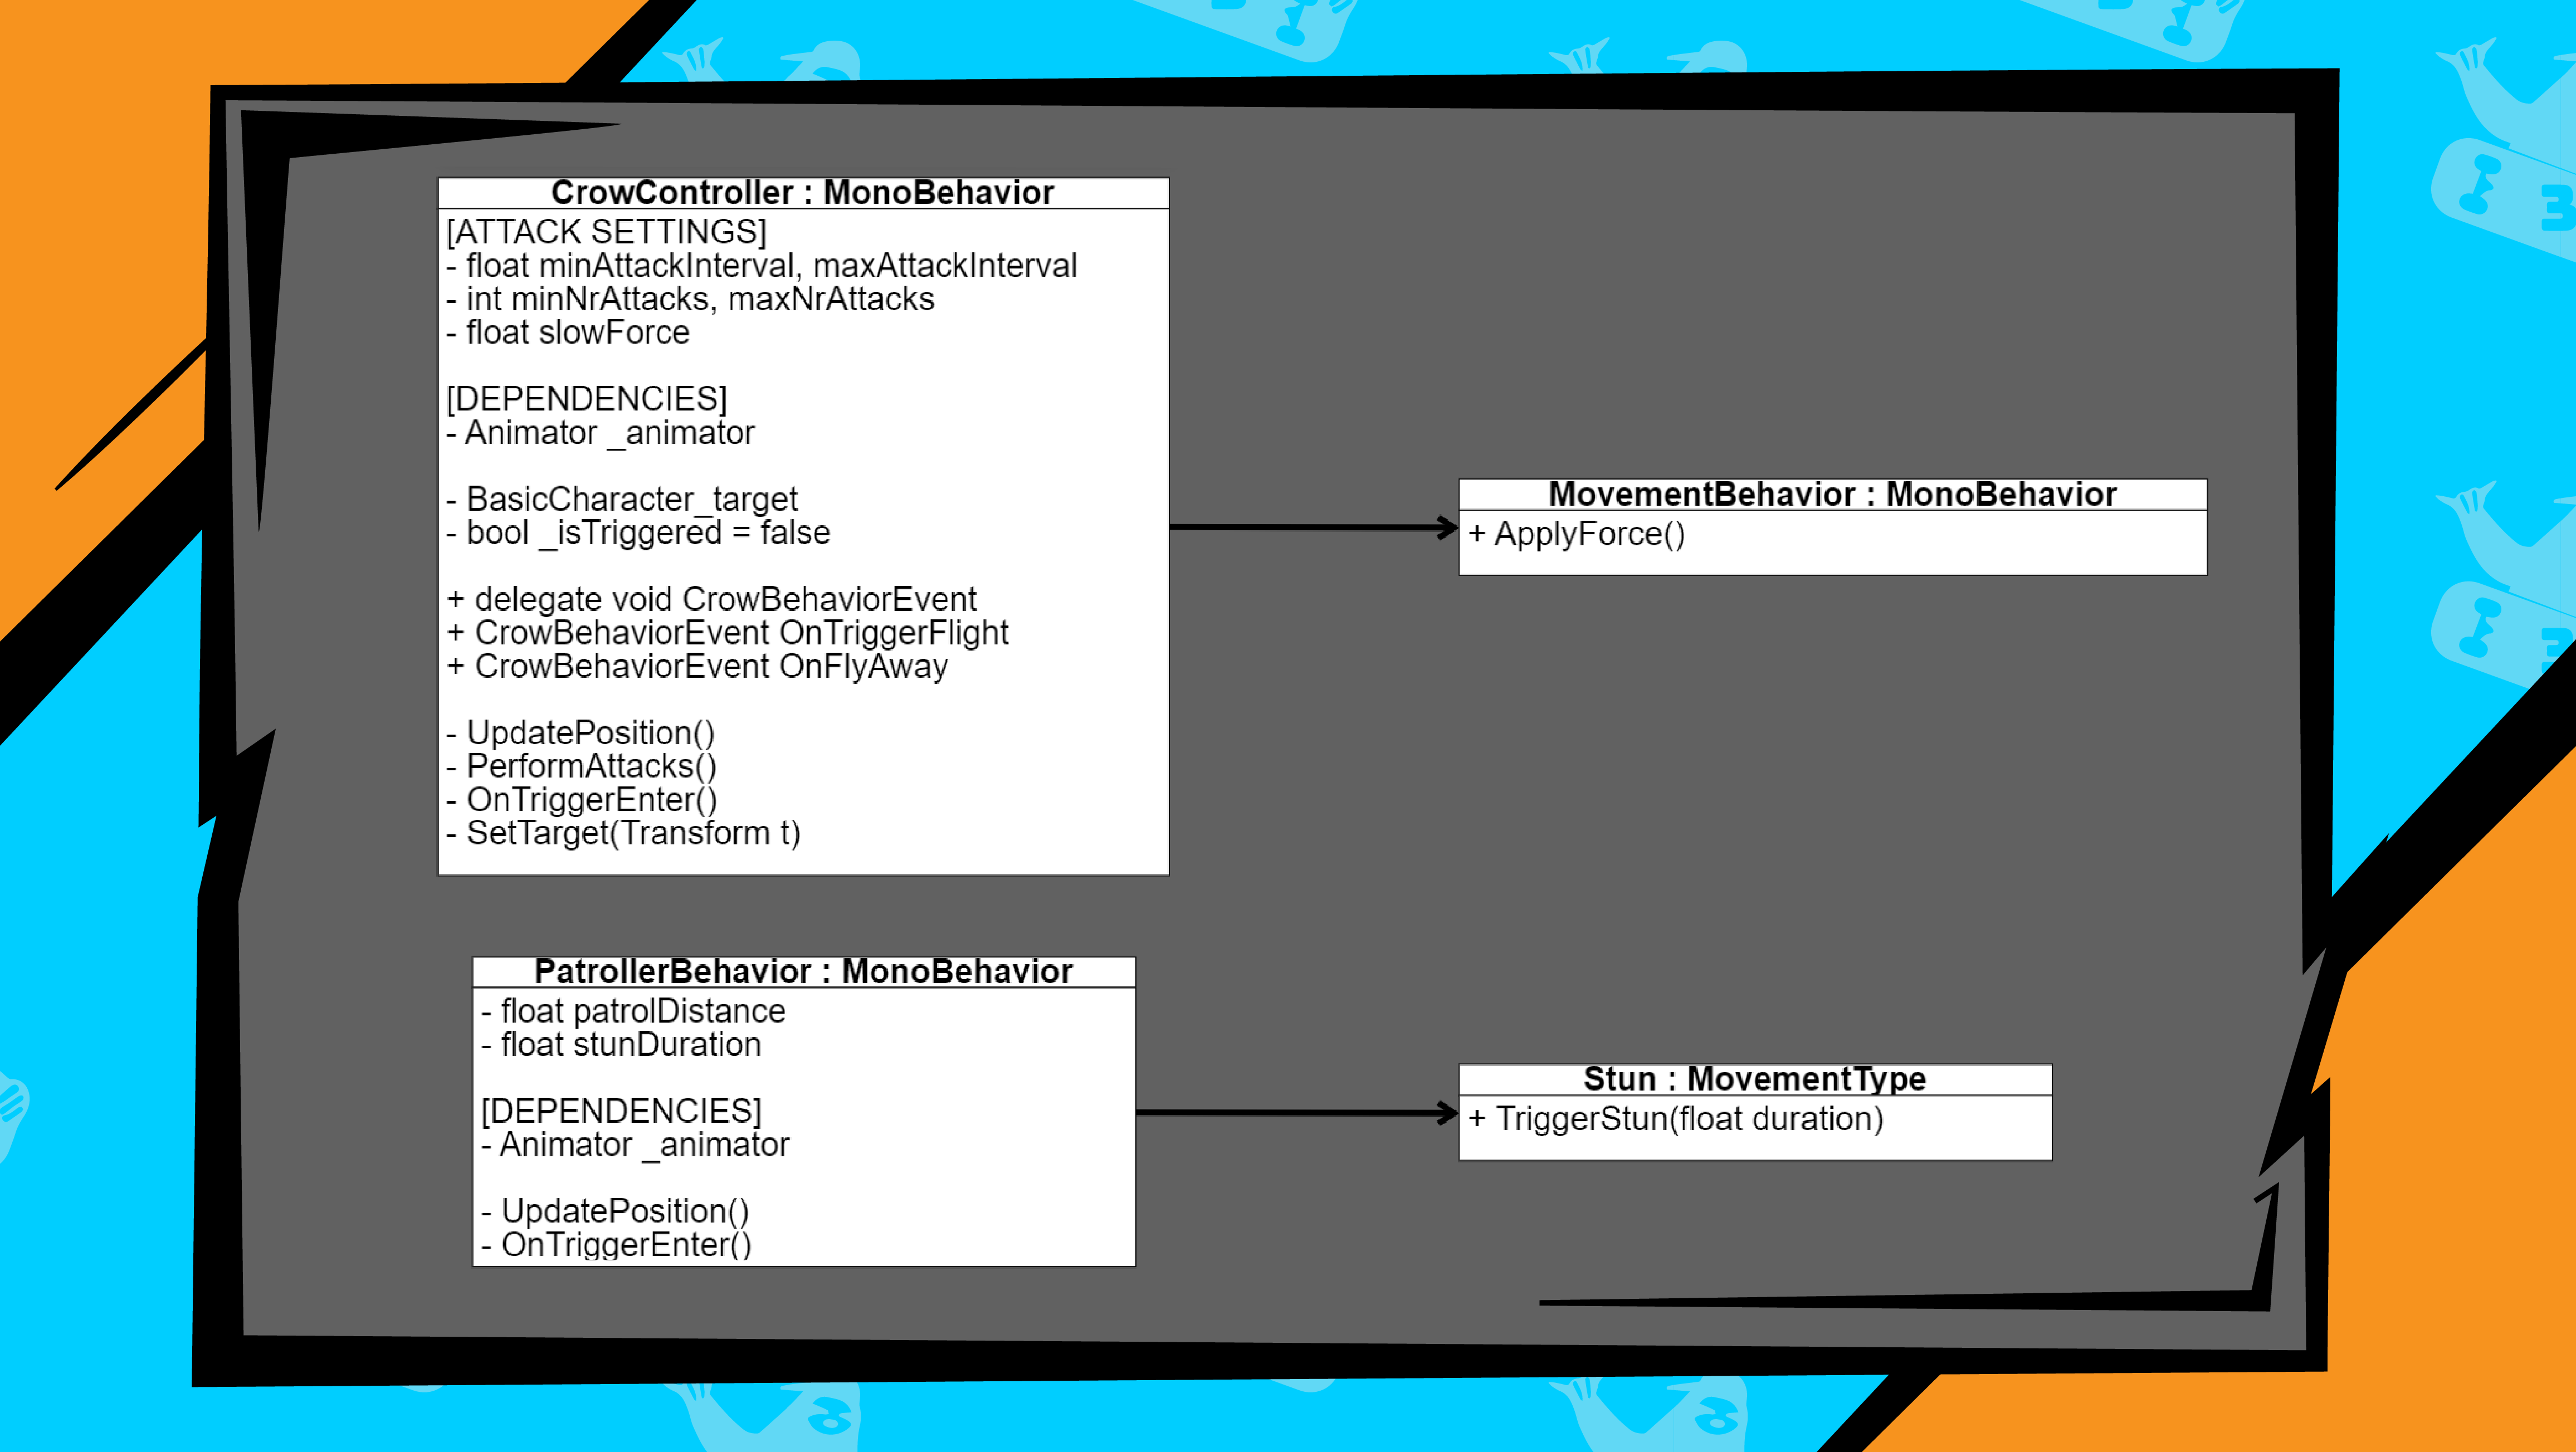
Since we don’t have extensive plans for enemies in our games, we are keeping this part simple. Each enemy type gets their script with their corresponding behavior.
2.6 Game Management
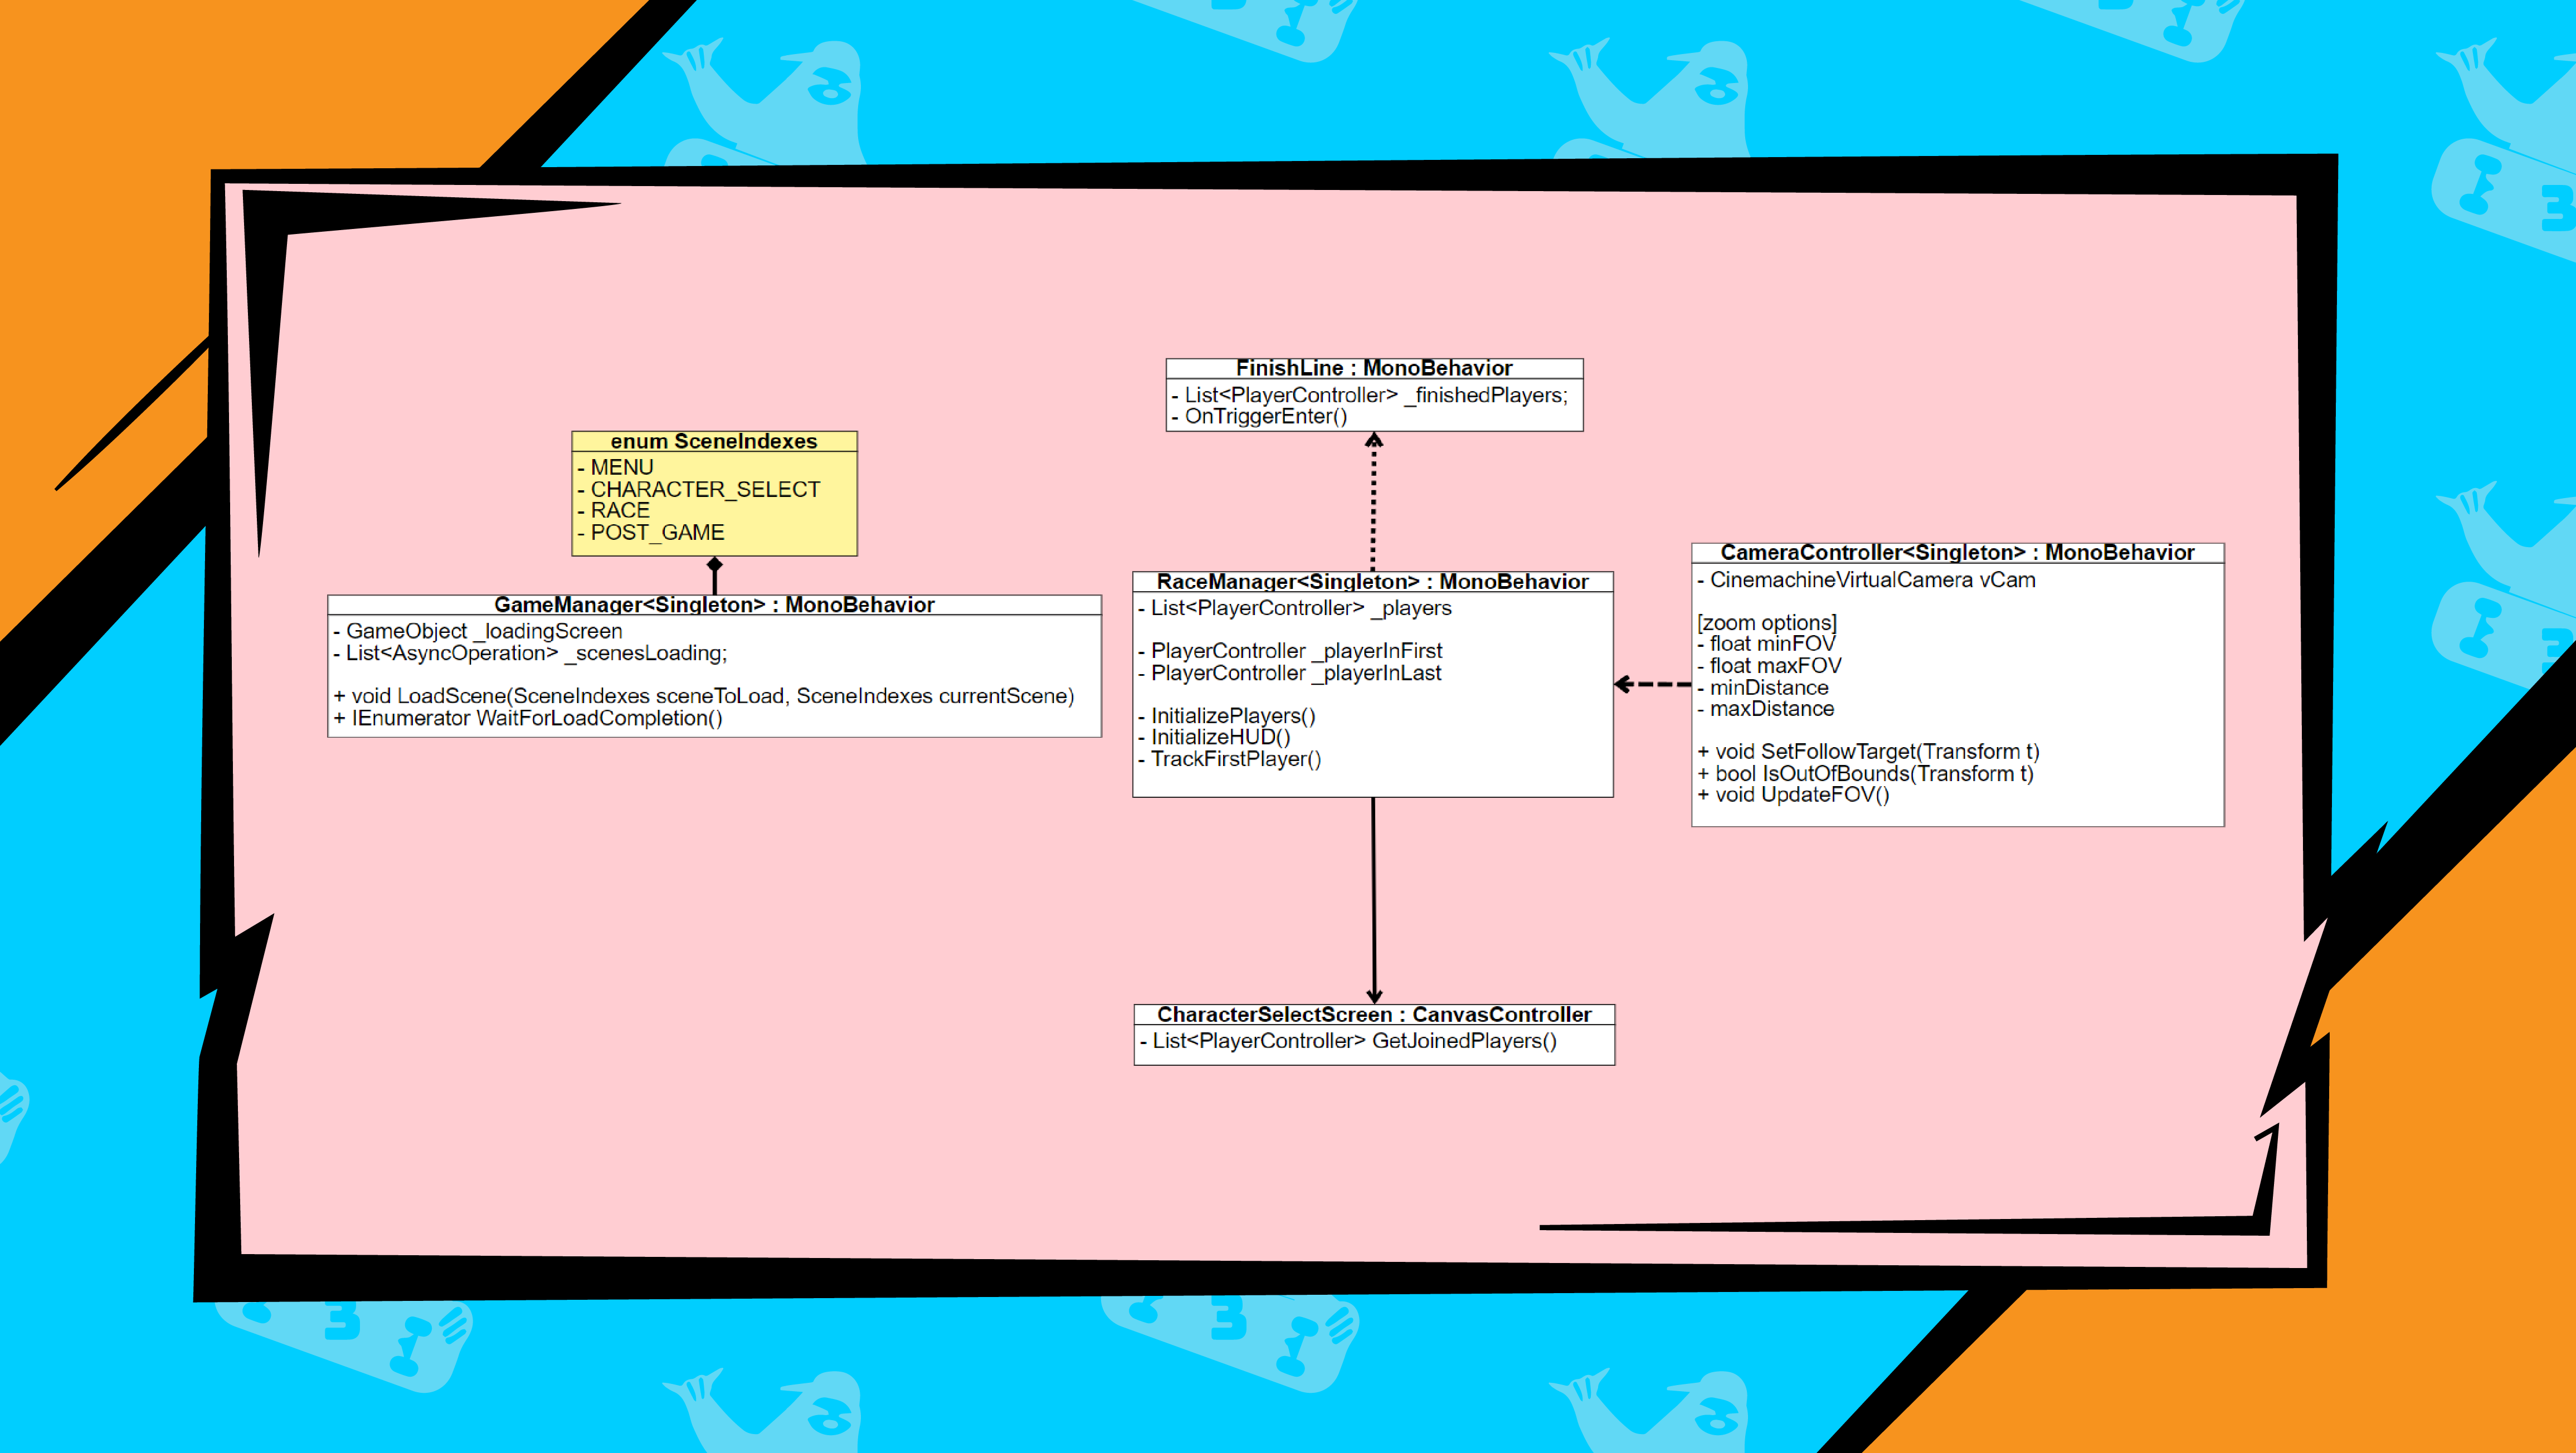
The way we manage our overarching game logic will be separated into two parts, a normal scene which is loaded and unloaded; in our case the race and the character selection screen. And a scene which is consistent and loaded asynchronously.
This async scene will be responsible for loading in the necessary “normal” scenes and managing the loading screen. The part which controls the loading will be the GameManager, it can also be used to pass data from one scene to another, for example the data of the joined players and their selected character.
The other part will only be the RaceManager for now. Since it’s our only gamemode and the character selection scene doesn’t need a manager for its functionality. The RaceManager will keep track of players positions and will feed data to the camera and keep track of players that finished the race.
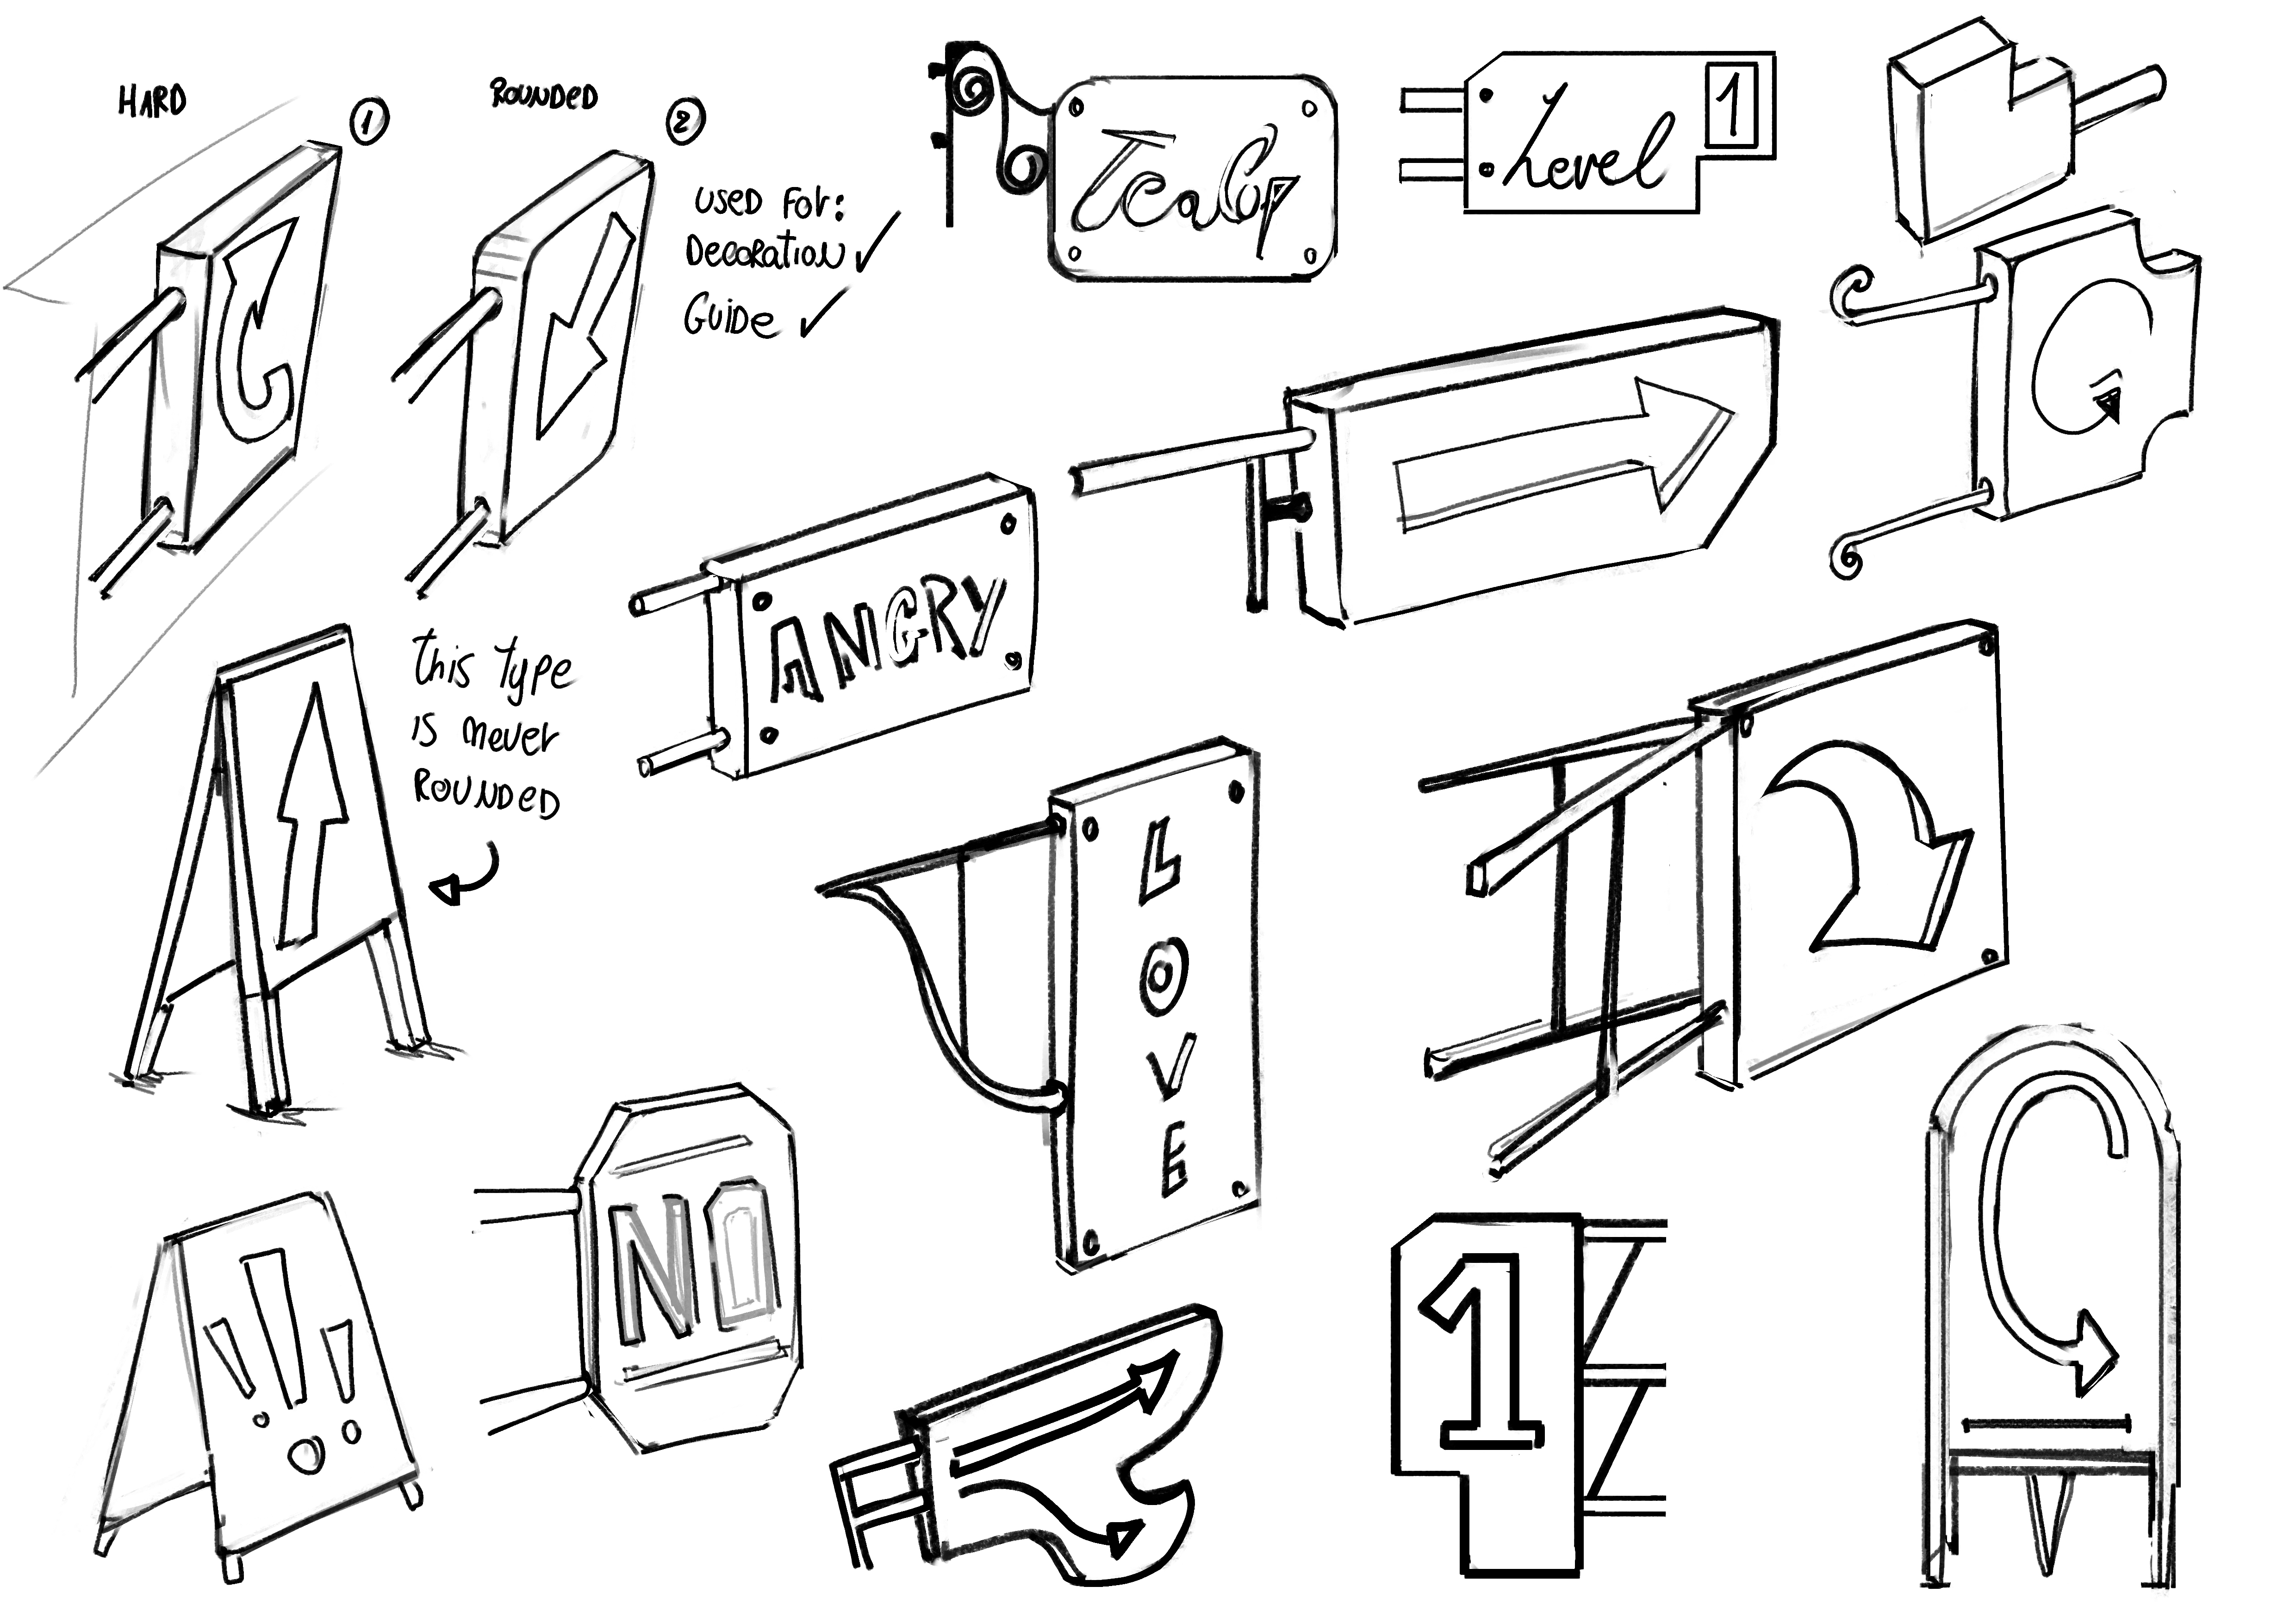
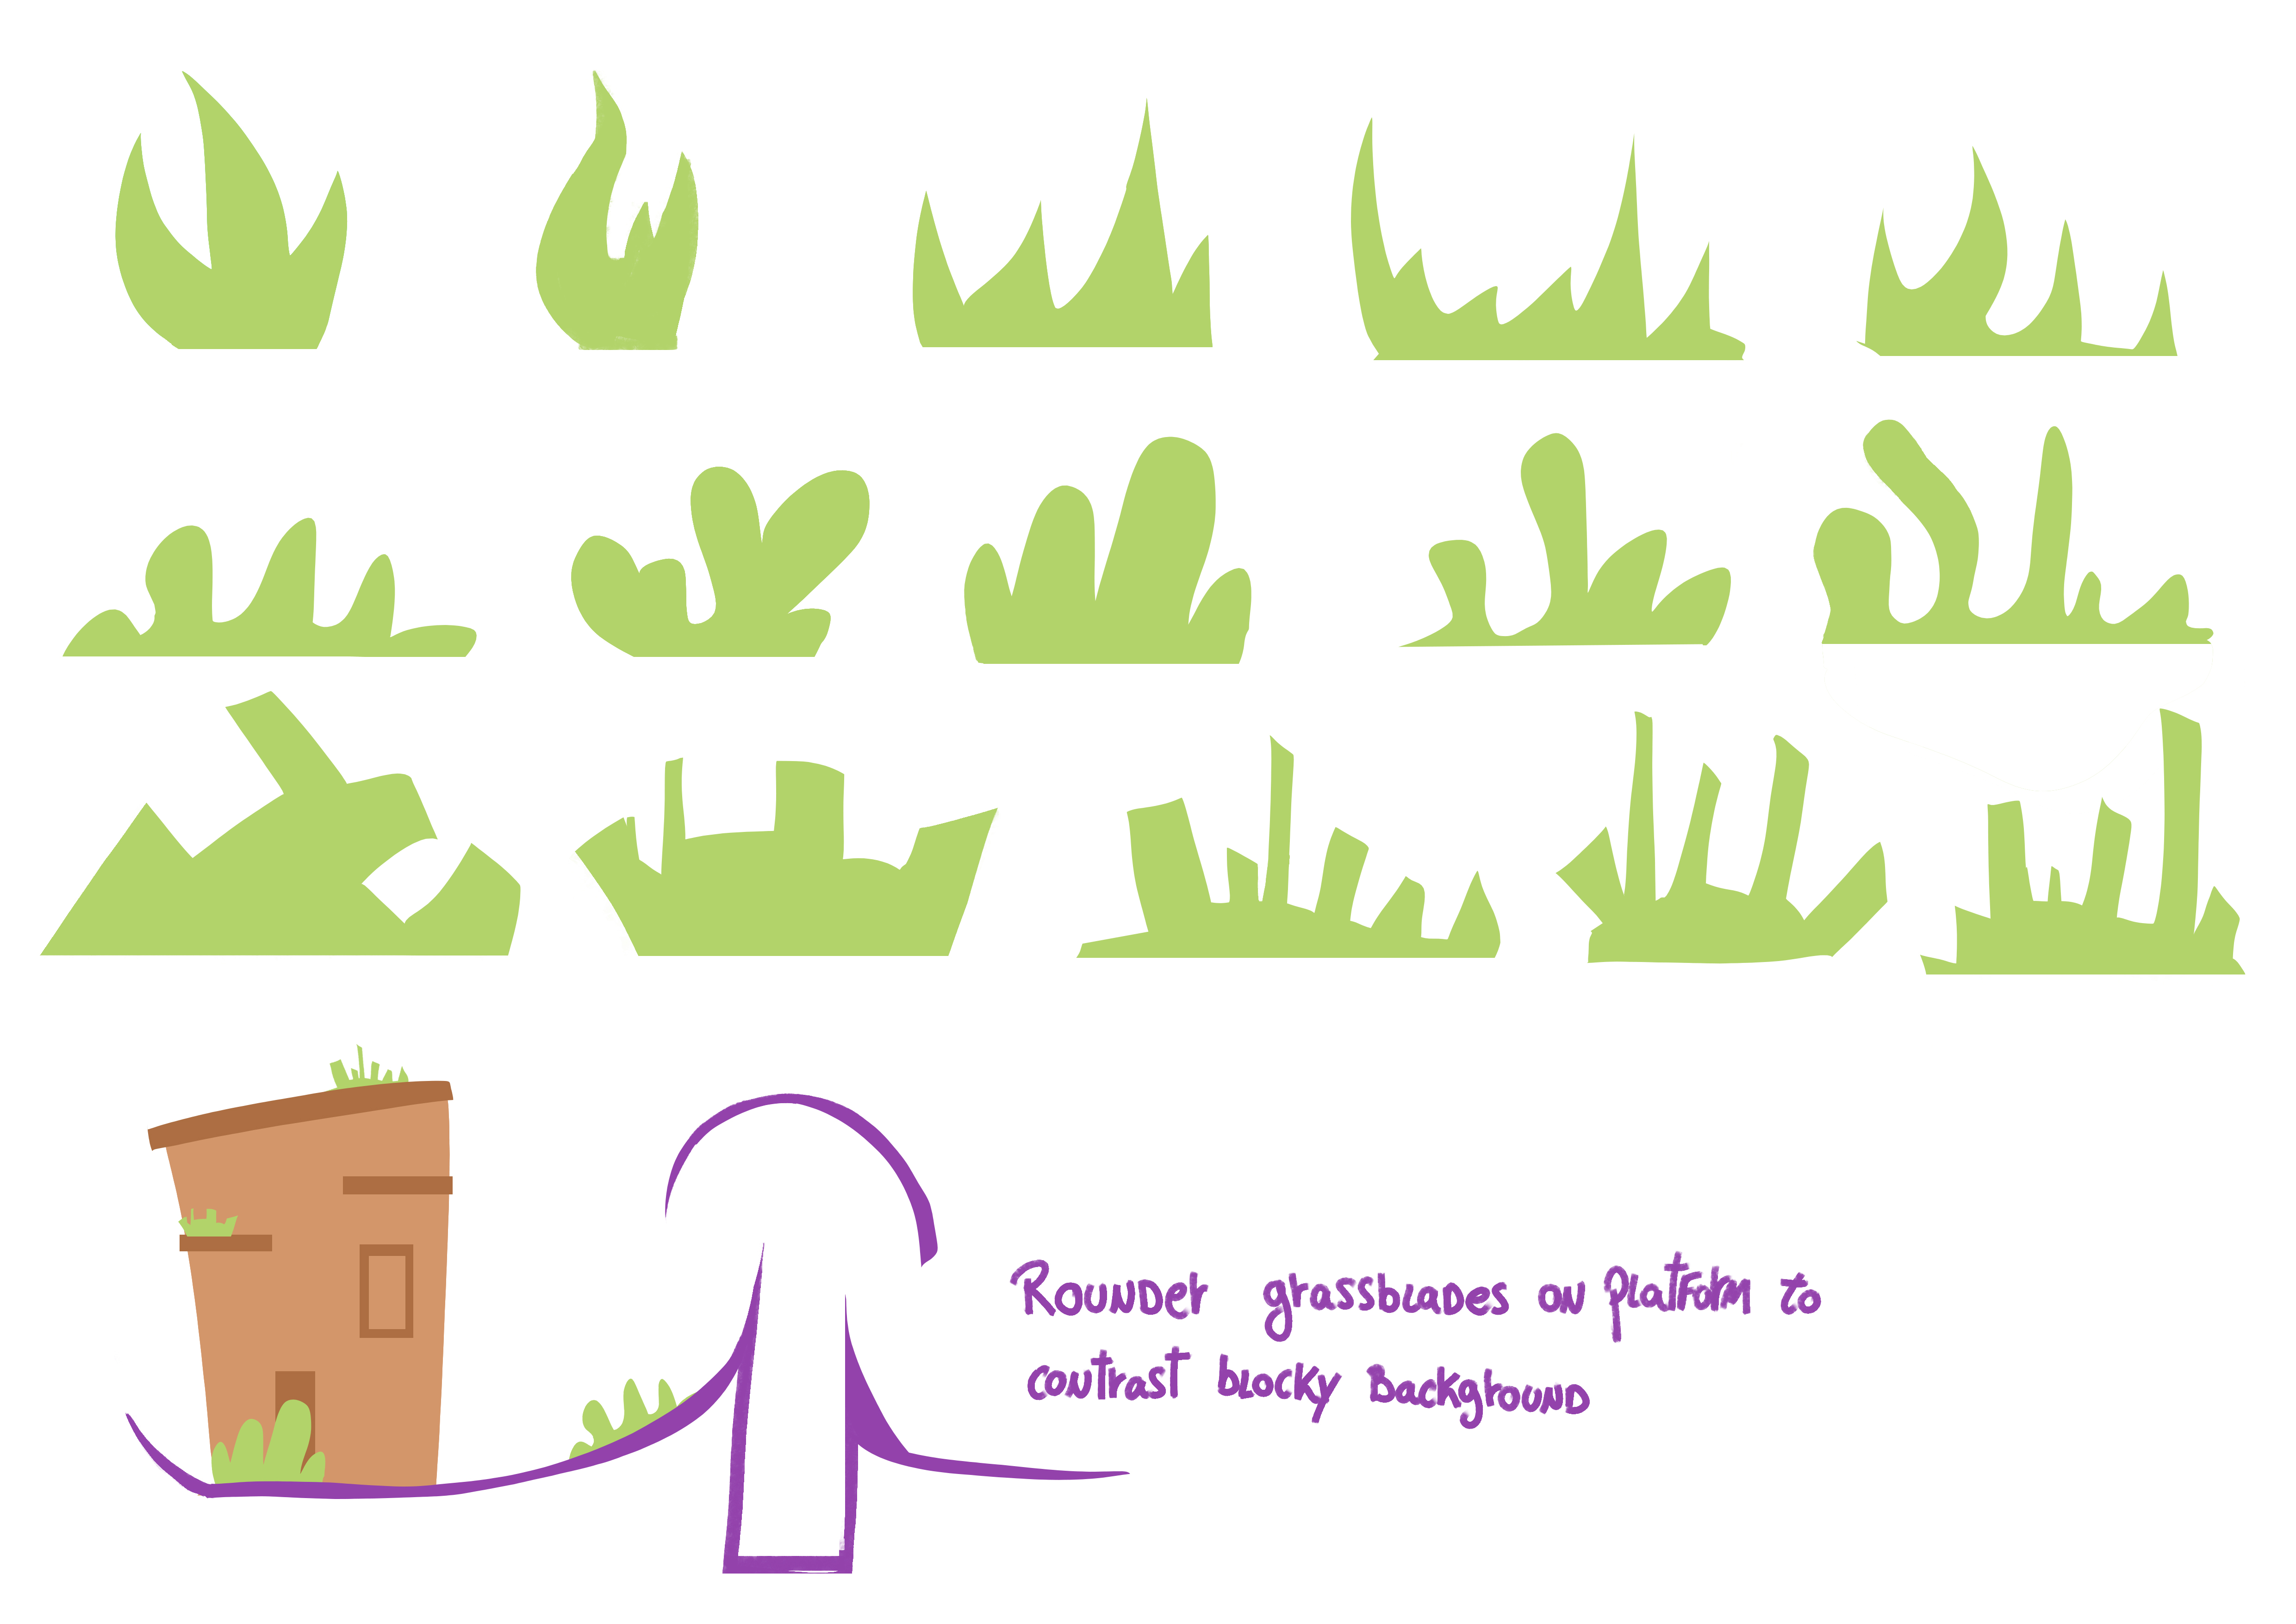
3. Environment
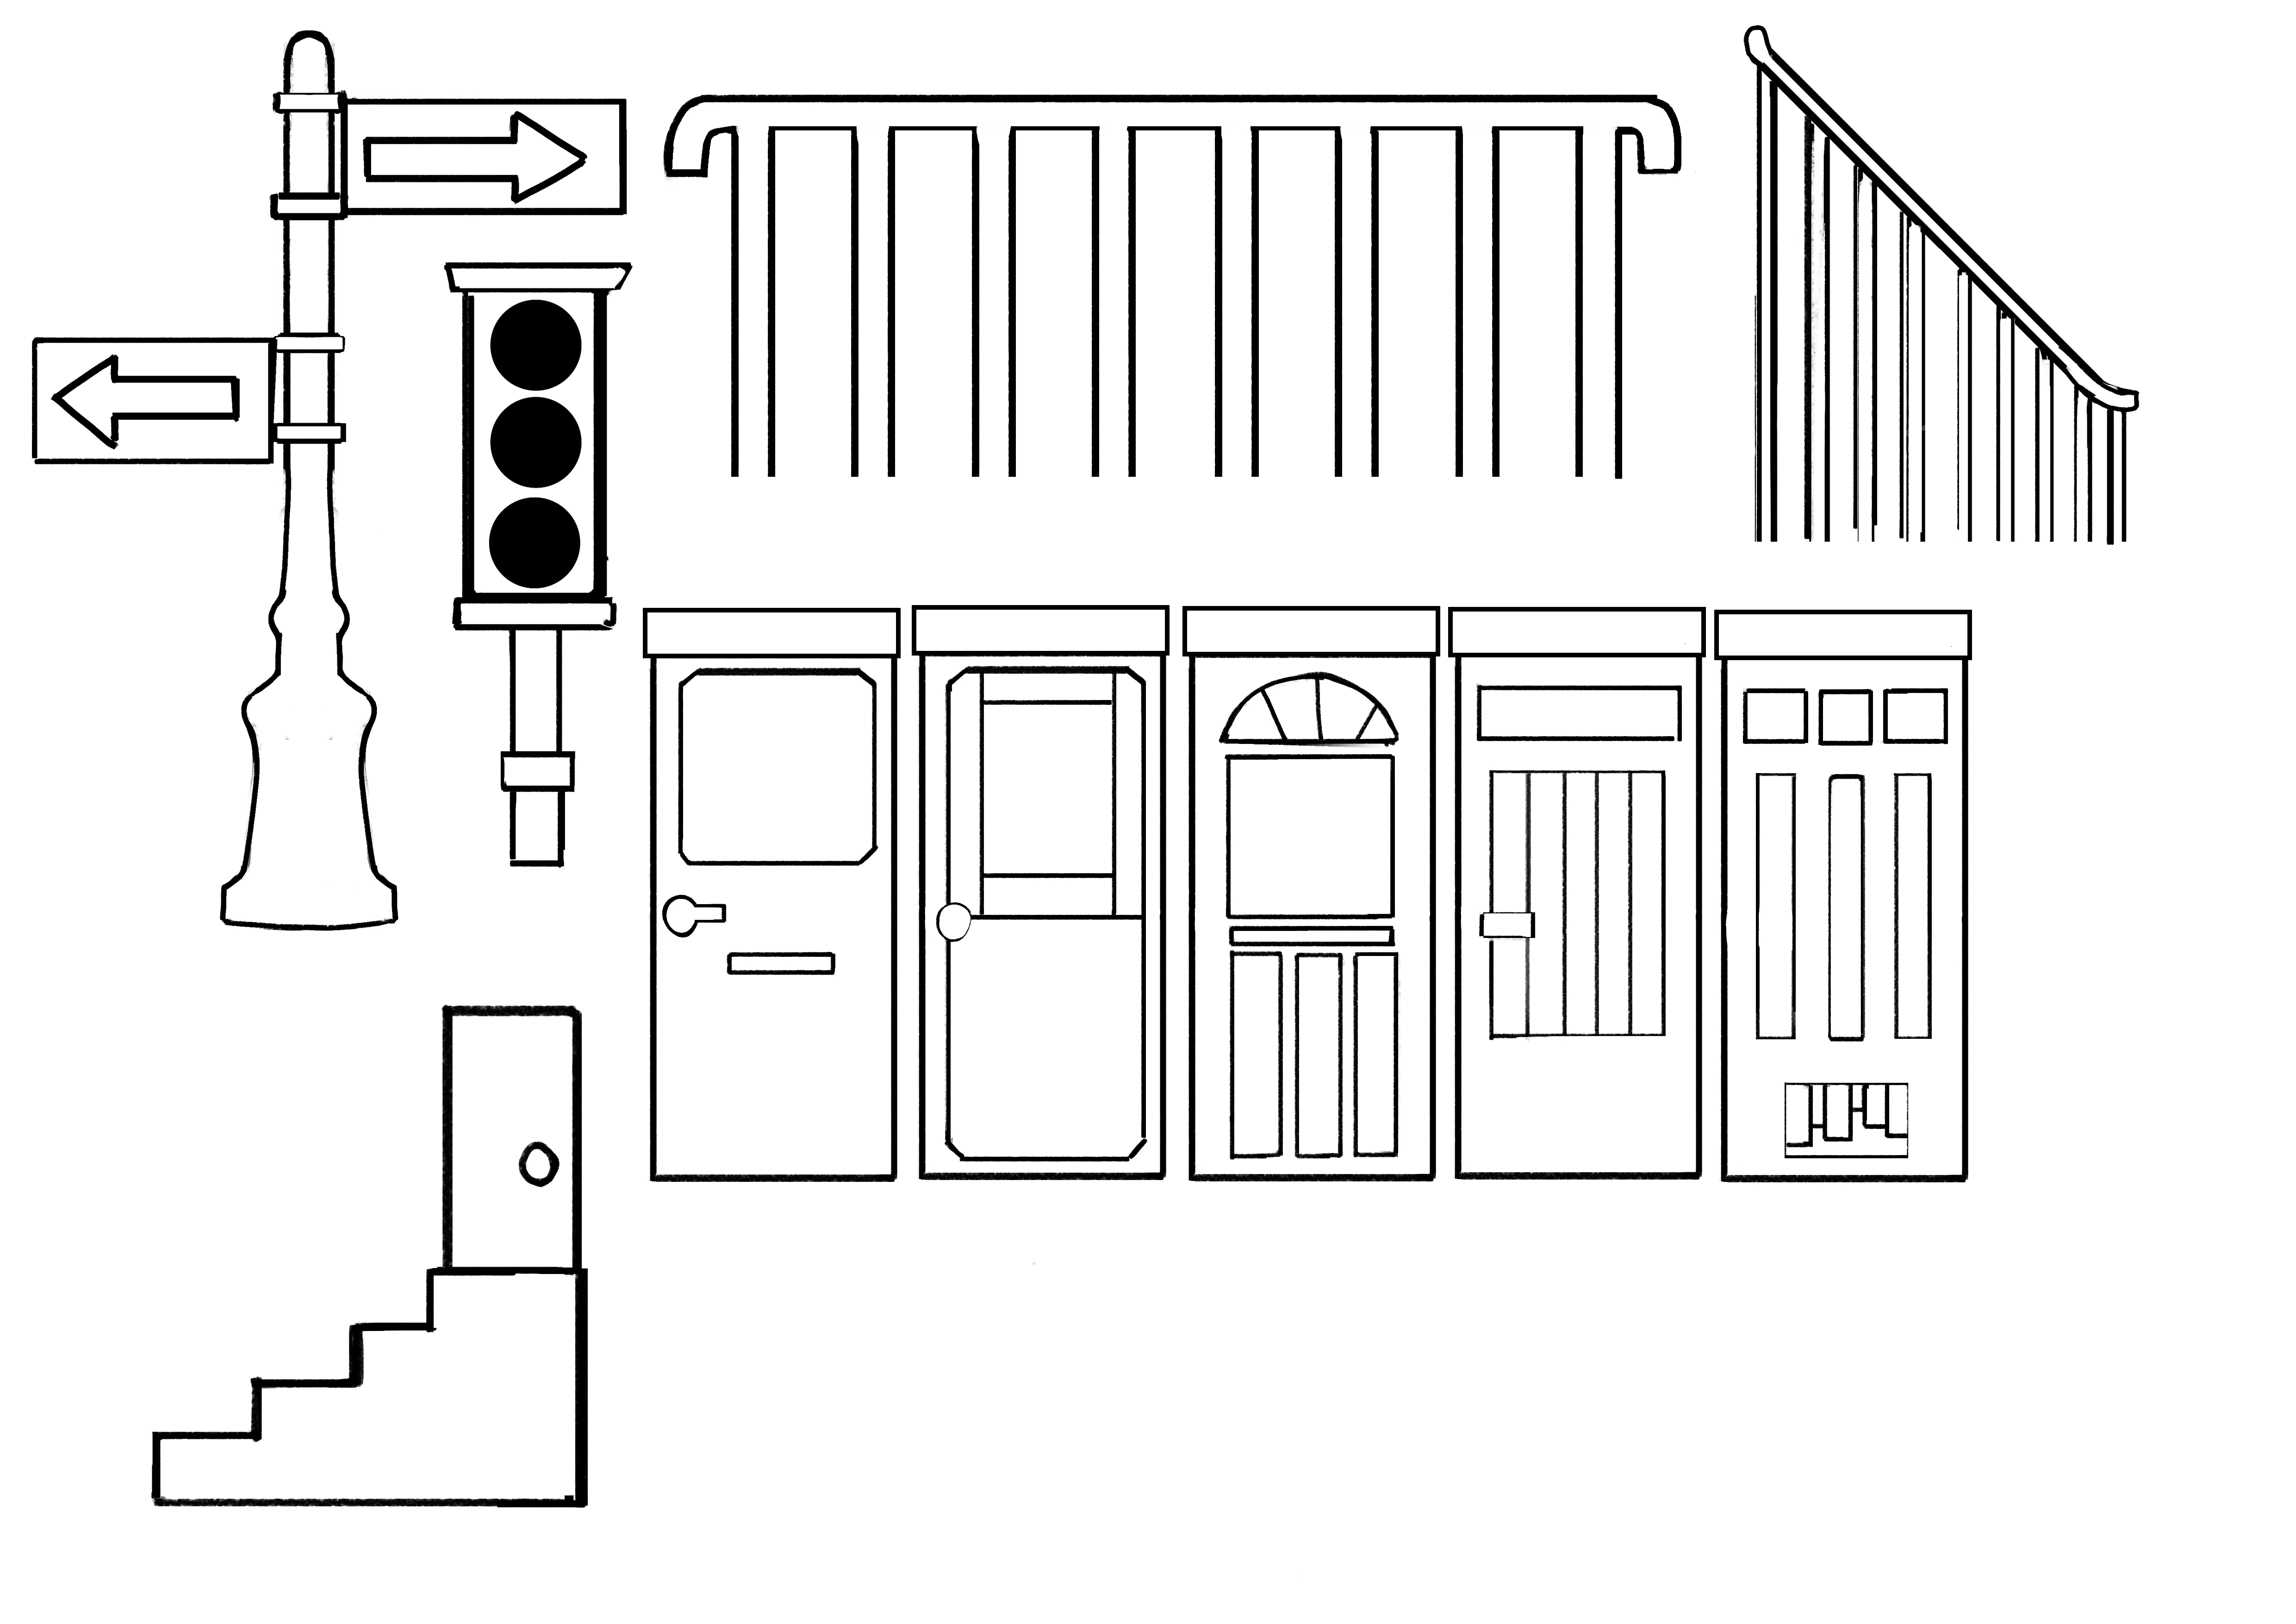
Nicolas started exploring some of the possible variations for level decoration in 2D. These variations will populate our level from start to finish. The idea is to start with just a few and scale the number according to our needs and time constraint.
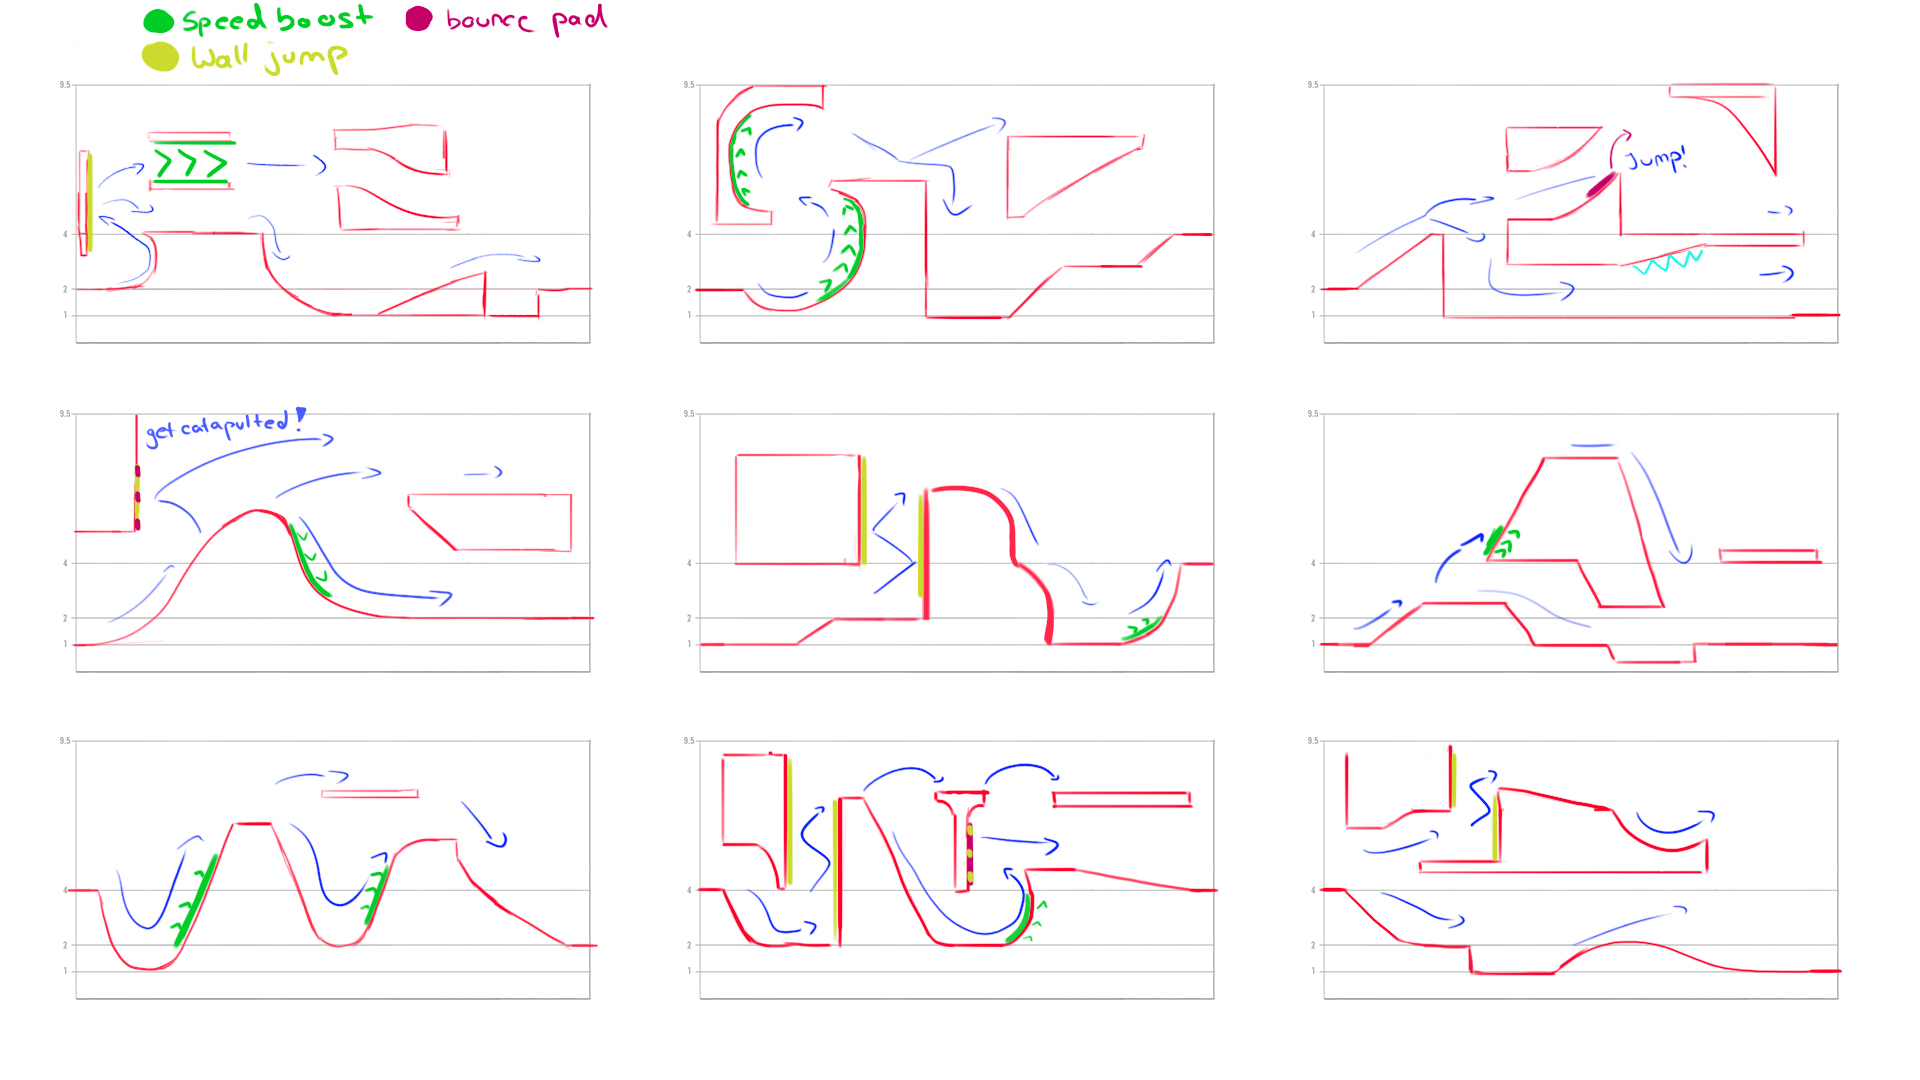
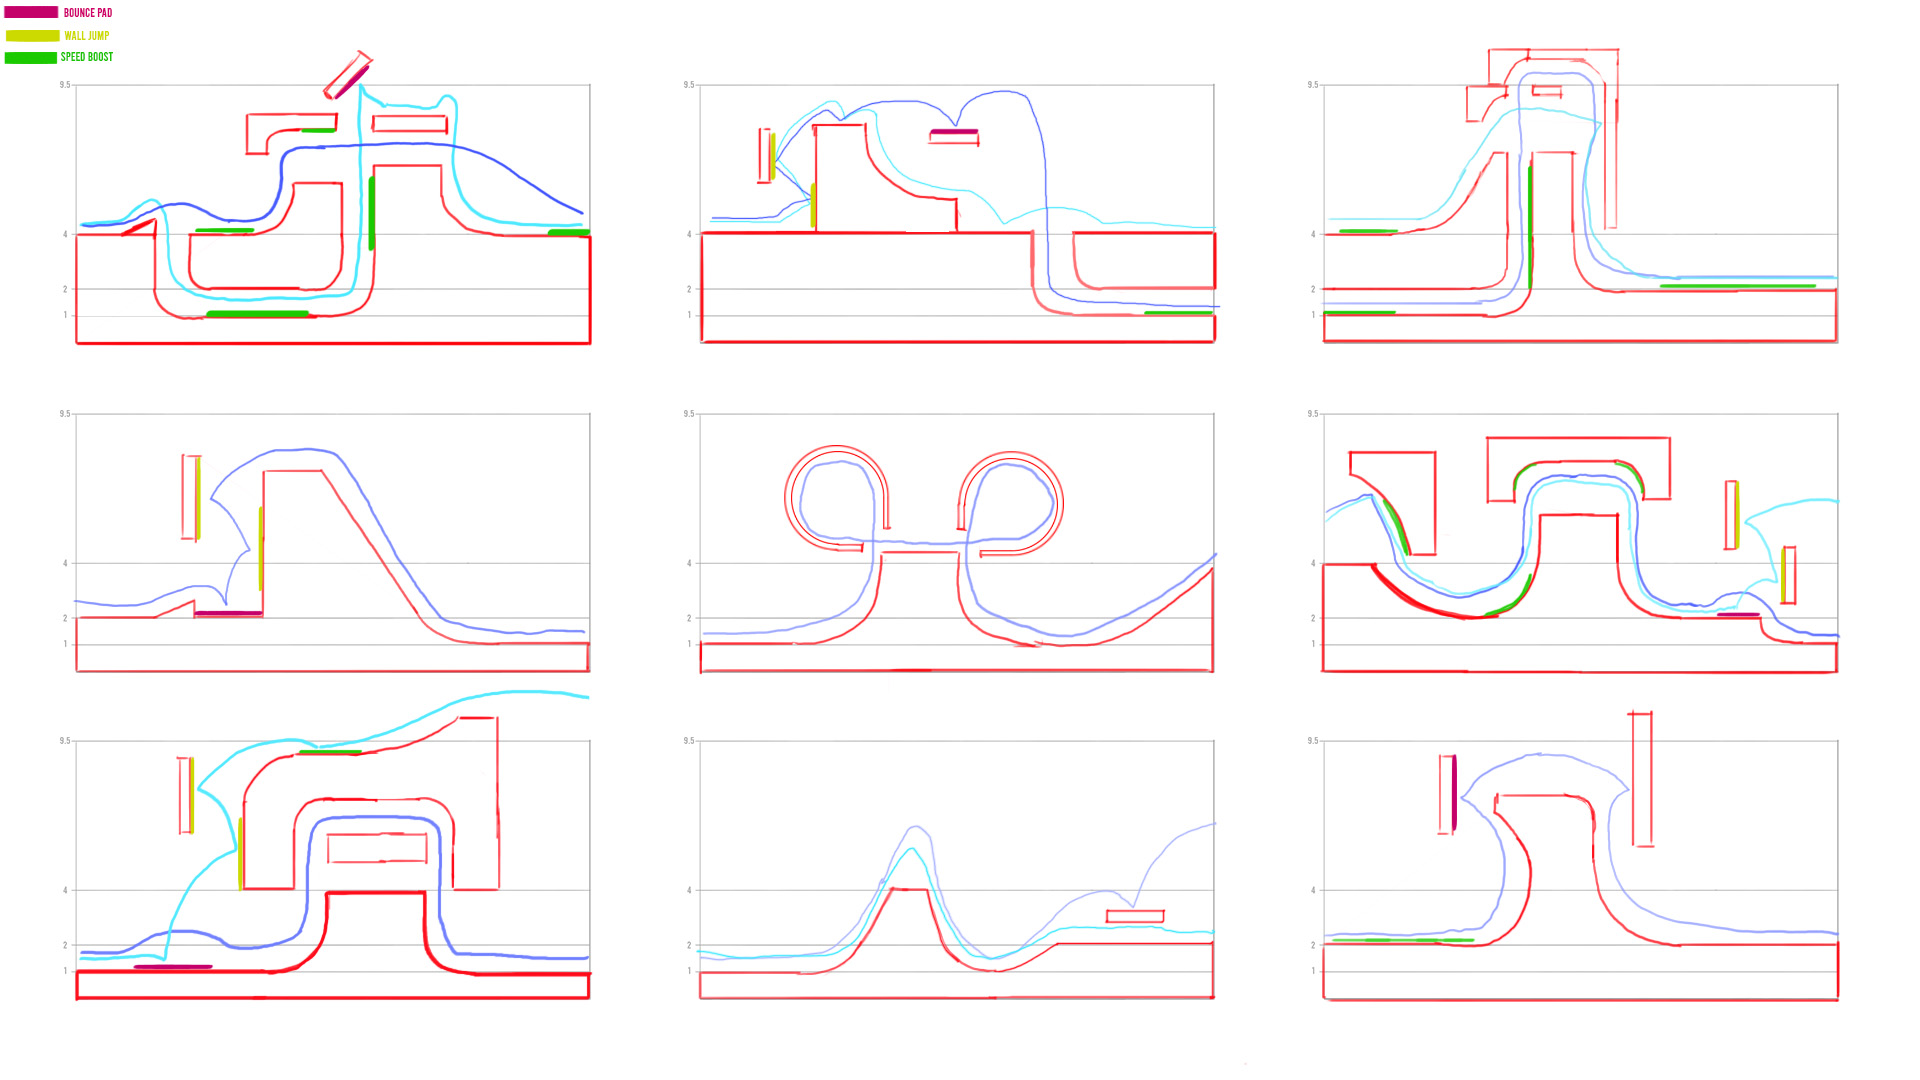
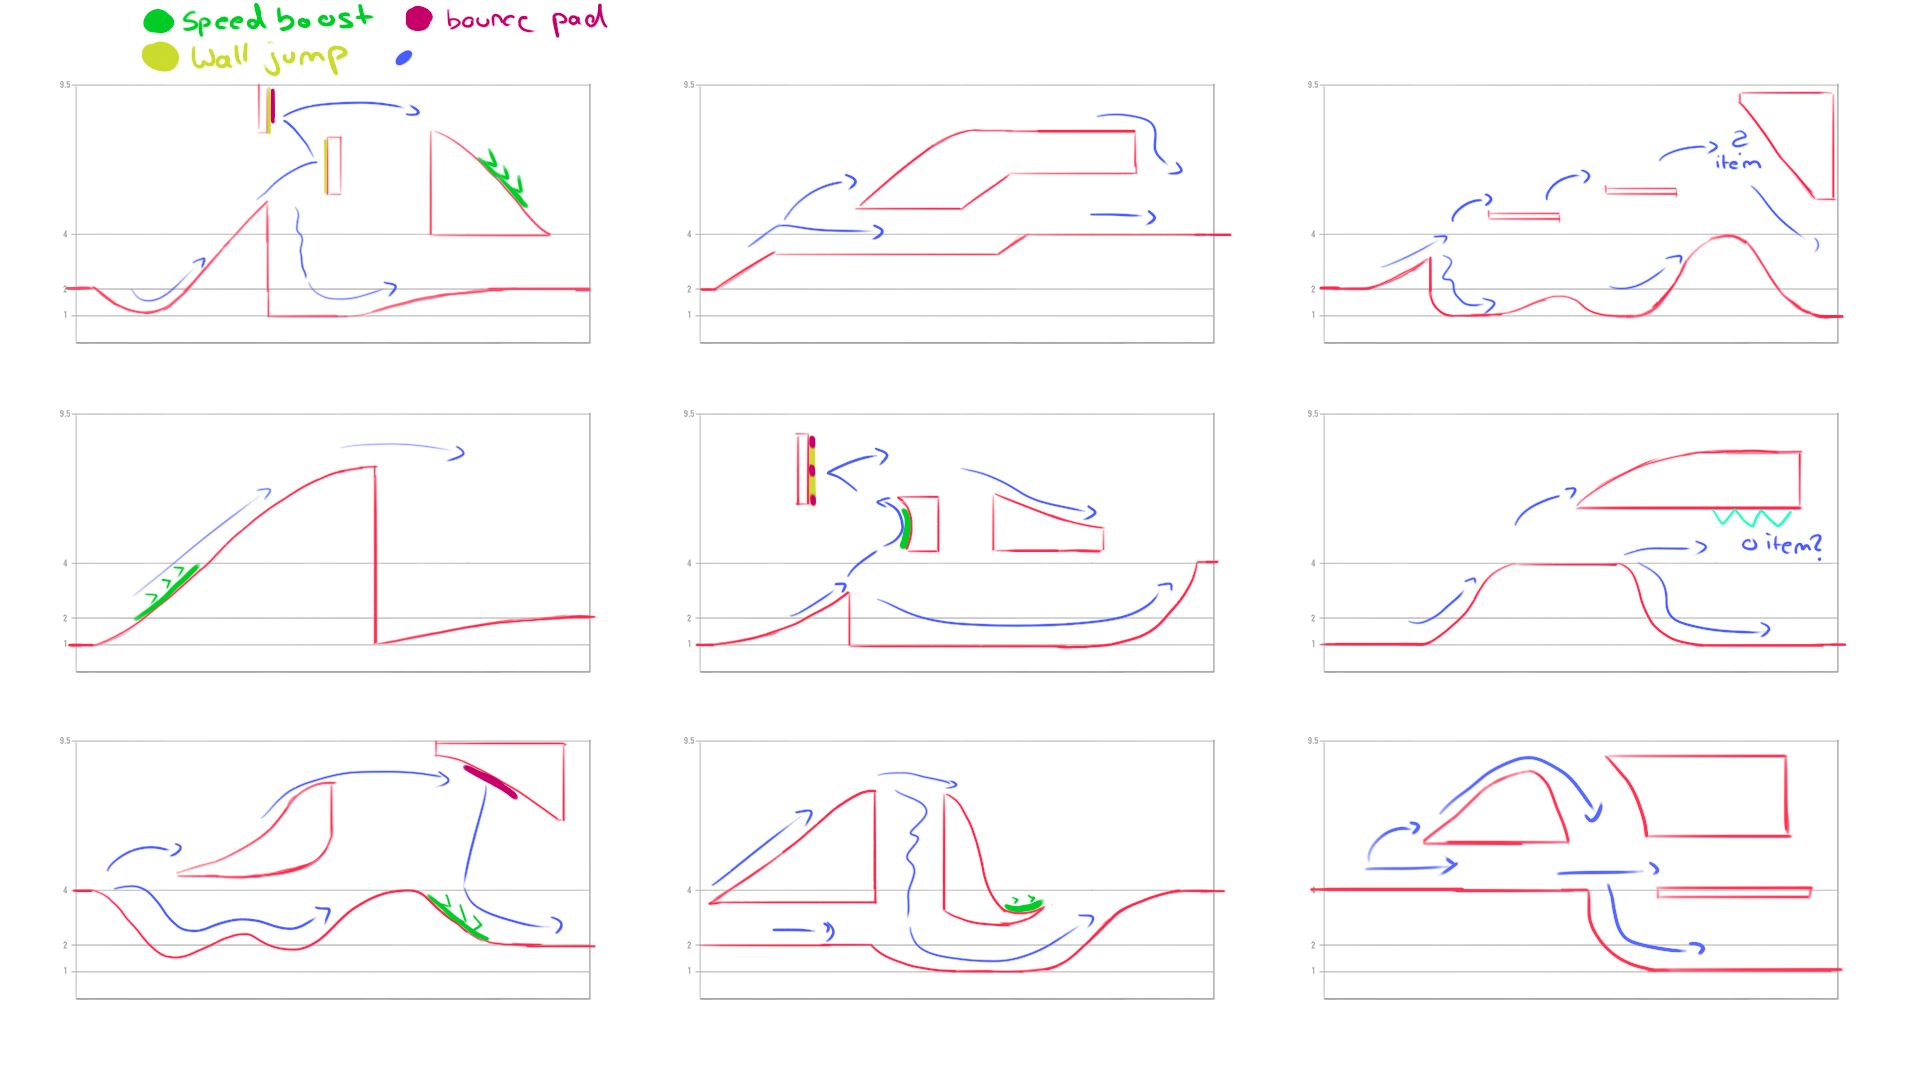
4. Level Design
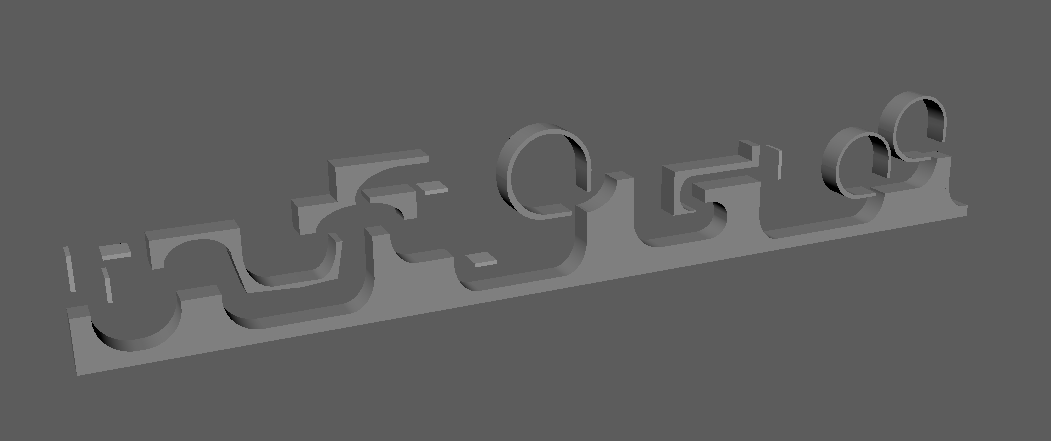
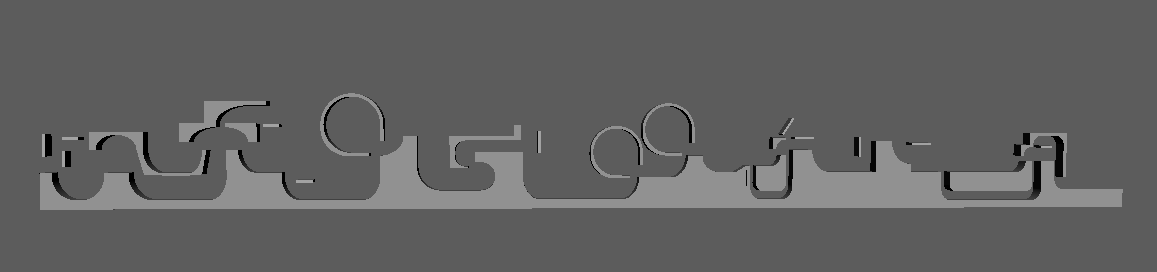
The artists Arthur, Stefan and Sarah worked on sketching out a lot of ideas for the level bundles which are the part of the environments the player will skate on. Arthur made a template in photoshop for that so it is easier to keep the height rules we predefined. These height rules are important so that the different bundles connect perfectly when put together in the engine. In the design phase some bundles are also already roughly modelled so that they can be tested before going into the actual model-phase for clean shapes, topology, etc. While sketching, the focus is on having smooth platforms to be skating on which are also fun and give different ways and opportunities to move forward.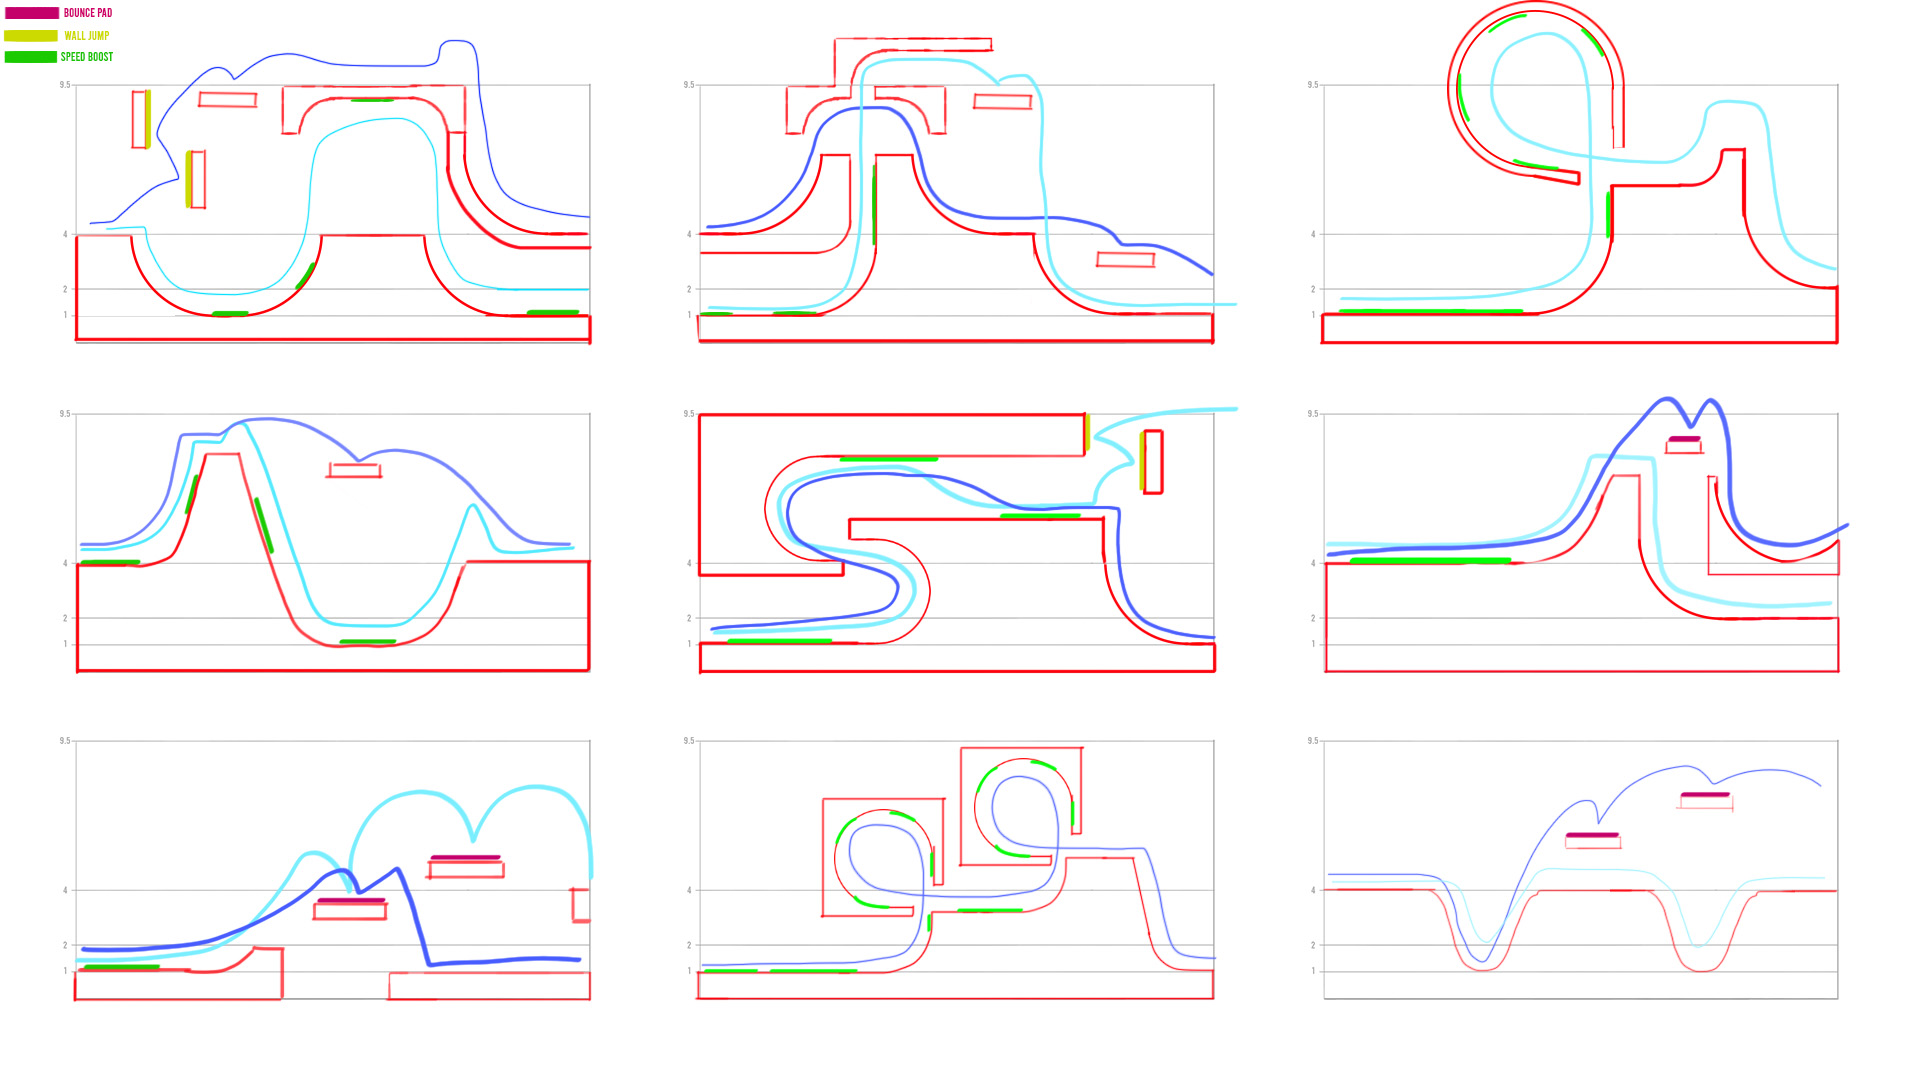

Leave a comment
Log in with itch.io to leave a comment.